
Chocolate thumbprint cookies are the answer to every home baker’s dream of creating impressive, delicious treats without spending hours in the kitchen. Have you ever started a cookie recipe only to find yourself overwhelmed by complicated steps and endless wait times? I understand that frustration completely.
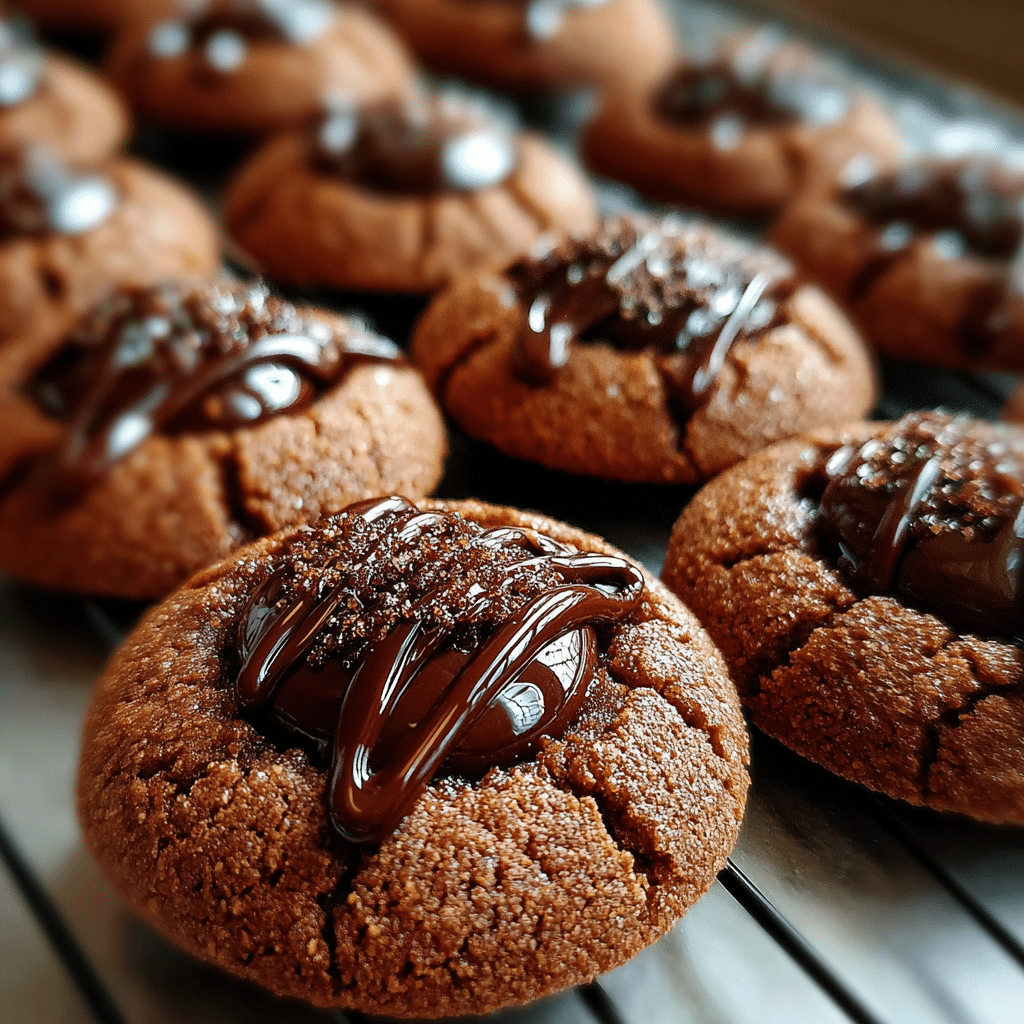
Hi, I’m Sam from dishfoody.com, and I’ve been on a mission to make baking more accessible and joyful for everyone. A few years ago, I was preparing for a last-minute gathering when I needed something special but quick. That’s when I perfected these chocolate thumbprint cookies buttery, rich, and absolutely stunning with their chocolate-filled centers. The best part? They’re ready in just 30 minutes from start to finish.
As someone who’s tested hundreds of cookie recipes and learned from countless kitchen experiments, I can confidently say these chocolate thumbprint cookies deliver bakery-quality results every single time. The secret lies in the perfect balance of a tender, melt-in-your-mouth base and a luscious chocolate center that doesn’t overpower the cookie.
In this guide, I’ll walk you through everything you need to know: selecting the right ingredients for optimal texture, mastering the thumbprint technique without cracking, achieving perfect baking times, and creative variations to match any occasion. Whether you’re a beginner or an experienced baker, you’ll find tips that elevate your cookie game.
Why This Chocolate Thumbprint Cookies Recipe Works
For me, cooking and baking aren’t just about following instructions—they’re about creating moments of joy and connection. These chocolate thumbprint cookies embody that philosophy perfectly. They work beautifully because they combine simplicity with sophistication, making them ideal for both casual family evenings and special celebrations.
Here’s why this chocolate thumbprint cookies recipe stands out:
- Uses pantry staples you already have – No specialty ingredients or expensive imports required
- Comes together in under 10 minutes of active prep – Perfect for busy schedules or spontaneous baking
- Incredibly versatile for any occasion – Works equally well for holiday cookie trays, birthday parties, or afternoon tea
- Foolproof technique that prevents common mistakes – The dough texture and baking method ensure consistent results
- Customizable to match any taste preference – From dark chocolate to white chocolate, caramel to jam fillings
- Makes approximately 24 cookies – The perfect quantity for sharing without overwhelming
The buttery cookie base provides a delicate crunch on the outside while staying tender inside, creating the ideal vessel for that rich chocolate center. Unlike complicated recipes that require chilling dough overnight or multiple steps, these chocolate thumbprint cookies streamline the process without sacrificing quality.
Choosing the Right Ingredients for Chocolate Thumbprint Cookies
The success of your chocolate thumbprint cookies depends significantly on ingredient selection. Quality matters, but so does understanding how each component functions in the recipe.
Best Chocolate for Chocolate Thumbprint Cookies
The chocolate filling is the star of these cookies, so choosing the right type makes all the difference. Semi-sweet chocolate chips work beautifully because they provide balanced sweetness without being cloying. Dark chocolate (60-70% cacao) creates a more sophisticated, less sweet profile that adults particularly appreciate. Milk chocolate offers a creamier, sweeter option that children often prefer.
I recommend using high-quality chocolate chips rather than candy melts or chocolate-flavored chips. Real chocolate contains cocoa butter, which gives that smooth, melting texture that makes these cookies special. Brands like Ghirardelli, Guittard, or even quality store brands work perfectly.
For the best results, look for chocolate chips that are uniform in size and have a glossy appearance. Avoid chocolate that appears dull or has white streaks (called bloom), which indicates improper storage.
Butter Selection Tips for Chocolate Thumbprint Cookies
Unsalted butter is essential for controlling the salt level in your chocolate thumbprint cookies. Butter should be at room temperature soft enough to leave an indent when pressed but not greasy or melted. This typically takes about 30-45 minutes out of the refrigerator.
European-style butter with higher fat content (82% versus standard 80%) creates an even more tender, flavorful cookie, though standard butter works excellently too. The key is avoiding margarine or butter substitutes, which don’t provide the same rich flavor or proper texture.
Flour Fundamentals for Perfect Chocolate Thumbprint Cookies
All-purpose flour is the foundation of these cookies. For the most accurate results, measure flour by spooning it into your measuring cup and leveling with a knife rather than scooping directly from the bag, which compacts the flour and can lead to dry cookies.
If you’re at high altitude (above 3,000 feet), you may need to add 1-2 tablespoons of additional flour to prevent spreading. For a gluten-free version, use a 1:1 gluten-free baking flour blend, though texture will be slightly different.
Sugar and Flavor Enhancers
Granulated sugar creates the structure and sweetness in chocolate thumbprint cookies, while powdered sugar (used for rolling) adds a delicate, professional finish. Pure vanilla extract—not imitation provides depth of flavor that complements the chocolate beautifully.
A small amount of salt enhances all the flavors and balances the sweetness. Even if you’re using salted butter, don’t skip the additional salt in the recipe it’s crucial for flavor development.
Ingredients & Prep for Chocolate Thumbprint Cookies
Proper preparation sets you up for baking success. Having everything measured and ready (what professional bakers call “mise en place”) makes the actual baking process smooth and enjoyable.
Cookie Dough Essentials for Chocolate Thumbprint Cookies
For the cookie base:
- 1 cup (2 sticks) unsalted butter, room temperature
- ½ cup granulated sugar
- 2 large egg yolks (save whites for another use)
- 2 teaspoons pure vanilla extract
- 2 cups all-purpose flour
- ¼ teaspoon salt
- ½ cup powdered sugar (for rolling, optional but recommended)
For the chocolate filling:
- 1 cup semi-sweet chocolate chips (about 6 ounces)
- 3 tablespoons heavy cream or full-fat coconut milk
- Optional: pinch of sea salt for finishing
Preparation Steps Before Baking Chocolate Thumbprint Cookies
Butter preparation: Remove butter from refrigerator 30-45 minutes before starting. It should be soft enough to blend easily but still hold its shape. If you forgot to soften it, cut butter into small cubes and let sit for 15 minutes—this speeds the process.
Egg separation: Separate eggs while cold (they separate more easily), but let yolks come to room temperature before mixing. Save the whites for an omelet or meringues.
Flour measurement: Whisk flour in its container to aerate, then spoon into measuring cups and level. Don’t pack or tap the cup.
Chocolate prep: If making the ganache filling (recommended for the smoothest texture), have your chocolate chips measured and cream ready. If using a simpler melted chocolate filling, you can prepare this while cookies cool.
Mixing and Handling Tips for Chocolate Thumbprint Cookies
The order of mixing matters significantly. Cream butter and sugar first until light and fluffy (about 2-3 minutes)—this incorporates air that makes cookies tender. Add egg yolks and vanilla, mixing just until combined. Finally, add flour and salt, mixing only until no white streaks remain. Overmixing after adding flour develops gluten, leading to tough cookies.
The dough should be soft but not sticky. If it’s too soft to handle, refrigerate for 15-20 minutes. If it seems dry and crumbly, add 1-2 teaspoons of cream or milk.
Step-by-Step Cooking Instructions for Chocolate Thumbprint Cookies
Following these steps carefully ensures bakery-quality chocolate thumbprint cookies every time. Don’t rush—each step builds on the previous one.
Pre-Cooking Prep for Chocolate Thumbprint Cookies
Preheat and prepare: Set your oven to 350°F (175°C). This temperature is crucial—too hot and cookies brown before baking through; too cool and they spread excessively. Position racks in the upper and lower thirds of the oven for even heat distribution.
Line two baking sheets with parchment paper or silicone baking mats. Don’t skip this step it prevents sticking and ensures even browning. If using parchment, cut it to fit your pans exactly for best results.
Shape the dough: Scoop dough using a cookie scoop (about 1 tablespoon) or roll by hand into balls about 1 inch in diameter. Uniform size ensures even baking. If rolling in powdered sugar, place sugar in a shallow bowl and roll each ball to coat completely, then place on prepared baking sheets about 2 inches apart.
Create the thumbprint: This is where technique matters. Use your thumb, the back of a rounded teaspoon, or a small melon baller to create an indentation in each cookie’s center. Press down about halfway through the cookie, creating a well approximately ½ inch deep and ¾ inch wide.
Common mistake to avoid: Pressing too gently creates shallow wells that bake closed. Press firmly and rotate your thumb slightly to widen the indentation. If cracks form around the edges, gently press them back together with your fingertips.
Cooking Method for Chocolate Thumbprint Cookies
Baking process: Place one sheet on the upper rack and one on the lower rack. Bake for 10-12 minutes, rotating sheets from top to bottom and front to back halfway through (at the 5-6 minute mark). This ensures even browning.
Visual cues for doneness: Chocolate thumbprint cookies are done when edges are just beginning to turn golden but centers still look slightly pale. The indentation should have maintained its shape but may have closed slightly—you can gently re-press with the back of a spoon while cookies are hot if needed.
Temperature precision: If you have an oven thermometer, verify your oven’s actual temperature. Many home ovens run 25°F hotter or cooler than the setting indicates, which significantly affects baking.
Doneness Check for Chocolate Thumbprint Cookies
Unlike meat, cookies don’t have internal temperature guidelines, so visual and textural cues are essential. The bottoms should be light golden (lift one gently with a spatula to check). The tops should no longer look raw or shiny.
Chocolate thumbprint cookies continue baking slightly after removal from the oven (called carryover cooking), so it’s better to slightly underbake than overbake. They should feel set around the edges but still soft in the center when you remove them.
Timing guide by size:
- 1-inch cookies: 10-12 minutes
- 1.5-inch cookies: 12-14 minutes
- Mini cookies (½-inch): 8-10 minutes
Resting and Filling Chocolate Thumbprint Cookies
Cooling process: Let chocolate thumbprint cookies cool on the baking sheet for 5 minutes. This allows them to firm up enough to transfer without breaking. Then move to a wire cooling rack to cool completely, about 15-20 minutes. Cooling on the rack (rather than the hot pan) prevents the bottoms from continuing to bake.
Preparing the chocolate filling: While cookies cool, make your filling. For ganache (the smoothest, most professional option): Heat cream in a microwave-safe bowl for 30 seconds until steaming but not boiling. Pour over chocolate chips and let sit for 2 minutes, then stir until completely smooth. For a thicker filling, let this cool for 5-10 minutes before filling cookies.
For a simpler approach, melt chocolate chips in 20-second microwave intervals, stirring between each, until smooth.
Filling technique: Once cookies are completely cool, spoon or pipe chocolate into each thumbprint indentation. Fill just to the top of the well—overfilling looks messy. If desired, sprinkle with flaky sea salt or holiday sprinkles before chocolate sets.
Let filled cookies sit at room temperature for 30 minutes to 1 hour until chocolate is set, or refrigerate for 15 minutes for faster setting.
Pro Tips for Perfect Chocolate Thumbprint Cookies
After making these cookies countless times and learning from both successes and mistakes, I’ve gathered insights that make a real difference.
Avoiding Common Mistakes with Chocolate Thumbprint Cookies
Preventing cracking: If your cookie dough cracks when you create the thumbprint, it’s likely too cold or too dry. Let it sit at room temperature for 5 minutes, or add a teaspoon of cream to the dough. You can also press more gently or use a smaller measuring spoon to create the indentation.
Stopping indentations from closing during baking: Make deeper, wider indentations than you think necessary they do close slightly during baking. Chilling formed cookies for 10 minutes before baking also helps them hold their shape.
Ensuring even baking: Rotate your baking sheets halfway through baking time. Use an oven thermometer to verify accurate temperature. Avoid opening the oven door repeatedly, which causes temperature fluctuations.
Preventing spreading: If cookies spread too much, your butter was likely too warm or you didn’t use enough flour. Chill dough for 30 minutes before baking. Ensure you’re measuring flour correctly (spoon and level, don’t scoop).
Tool Recommendations for Chocolate Thumbprint Cookies
Essential tools:
- Cookie scoop (1-tablespoon size) for uniform cookies
- Parchment paper or silicone baking mats for easy cleanup and even baking
- Wire cooling racks (at least two) for proper cooling
- Rubber spatula for mixing and scraping bowls clean
Nice-to-have tools:
- Small melon baller or tart tamper for creating perfect indentations
- Piping bag or squeeze bottle for filling cookies neatly
- Oven thermometer for temperature accuracy
- Kitchen scale for measuring ingredients by weight (more accurate than volume)
Storage & Reheating for Chocolate Thumbprint Cookies
Room temperature storage: Store chocolate thumbprint cookies in an airtight container at room temperature for up to 5 days. Place parchment paper between layers to prevent sticking. Keep them away from direct sunlight or heat sources that could melt the chocolate.
Refrigeration: In hot or humid climates, refrigerate cookies to keep chocolate from softening. Bring to room temperature before serving for the best texture and flavor.
Freezing: These cookies freeze beautifully. Freeze unfilled cookies in a single layer on a baking sheet, then transfer to freezer bags or airtight containers for up to 3 months. Thaw at room temperature, then fill with fresh chocolate. Alternatively, freeze filled cookies (let chocolate set completely first) using the same method. They’ll taste freshly baked after thawing.
Make-ahead strategy: Prepare dough up to 2 days ahead and refrigerate, or freeze for up to 2 months. Shape and bake from room temperature. You can also bake cookies and store unfilled, then add chocolate filling the day of serving for the freshest taste.
Looking for more delightful breakfast and dessert ideas? Check out my Pancake Poppers Recipe for another crowd-pleasing treat that’s perfect for any time of day!
Flavor Variations for Chocolate Thumbprint Cookies
The beauty of chocolate thumbprint cookies lies in their adaptability. Once you master the basic technique, you can customize them endlessly to suit different occasions and preferences.
Sweet Variations for Chocolate Thumbprint Cookies
White chocolate filling: Substitute white chocolate chips for semi-sweet chocolate in your ganache. White chocolate pairs beautifully with the buttery cookie base and creates an elegant look. Consider adding ¼ teaspoon of almond extract to the filling for a sophisticated twist.
Dark chocolate raspberry: Use dark chocolate (70% cacao) for the filling and add 2 tablespoons of raspberry jam mixed into the ganache. Alternatively, place a small dollop of jam in the thumbprint before adding chocolate.
Salted caramel: Fill thumbprints with dulce de leche or thick caramel sauce, then drizzle with melted chocolate and sprinkle with flaky sea salt. This sweet-salty combination is absolutely addictive.
Nutella lovers: Simply fill the thumbprints with Nutella instead of making a chocolate ganache. This saves time and adds hazelnut flavor.
Dietary Adaptations for Chocolate Thumbprint Cookies
Gluten-free chocolate thumbprint cookies: Use a 1:1 gluten-free baking flour blend (like Bob’s Red Mill or King Arthur). The texture will be slightly more delicate but still delicious. Add 1 teaspoon of xanthan gum if your flour blend doesn’t already contain it.
Dairy-free chocolate thumbprint cookies: Replace butter with vegan butter (brands like Miyoko’s or Earth Balance work well) and use full-fat coconut milk instead of cream in the ganache. Ensure your chocolate chips are dairy-free (many dark chocolate varieties are).
Keto/low-carb: Use almond flour (2½ cups) instead of all-purpose flour, and substitute granulated erythritol for sugar. Use sugar-free chocolate chips. Note that texture will be different—more crumbly and less chewy.
Reduced sugar: Cut the sugar in the cookie base to ⅓ cup and use 70% dark chocolate for filling, which contains less sugar than semi-sweet varieties.
Global Flavor Profiles for Chocolate Thumbprint Cookies
Mexican hot chocolate: Add ½ teaspoon cinnamon and ¼ teaspoon cayenne pepper to the cookie dough. Fill with dark chocolate ganache mixed with a pinch of cinnamon.
Italian amaretti-inspired: Add ½ teaspoon almond extract to the cookie dough and roll cookies in sliced almonds instead of powdered sugar before baking. Fill with chocolate ganache.
French-inspired: Add 1 tablespoon instant espresso powder to the cookie dough for a subtle coffee flavor that enhances the chocolate filling.
Middle Eastern: Add ¼ teaspoon cardamom to the cookie dough and fill with dark chocolate ganache mixed with a pinch of cardamom and rosewater.
| Variation | Flavor Addition | Filling Modification | Dietary Tag |
|---|---|---|---|
| Classic Chocolate | None | Semi-sweet chocolate ganache | Traditional |
| White Chocolate Raspberry | None | White chocolate + raspberry jam | Vegetarian |
| Dark Chocolate Sea Salt | None | Dark chocolate + flaky salt | Refined |
| Nutella Hazelnut | ½ tsp almond extract | Nutella | Nut-based |
| Salted Caramel | None | Dulce de leche + chocolate drizzle | Indulgent |
| Mexican Chocolate | ½ tsp cinnamon, ¼ tsp cayenne | Dark chocolate + cinnamon | Spiced |
| Dairy-Free | None | Dark chocolate + coconut milk | Vegan-friendly |
| Gluten-Free | None (use GF flour) | Any chocolate filling | Gluten-free |
| Keto-Friendly | None (use almond flour) | Sugar-free chocolate | Low-carb |
| Espresso Chocolate | 1 tbsp instant espresso | Dark chocolate ganache | Coffee-enhanced |
Want to explore more impressive dessert recipes? My Baked Crème Brûlée Donuts Recipe offers another show-stopping treat that’s easier to make than you’d think!
Serving Suggestions for Chocolate Thumbprint Cookies
Presentation and pairing elevate chocolate thumbprint cookies from simple treats to memorable experiences. These cookies are versatile enough for casual family desserts or elegant entertaining.
Perfect Pairings with Chocolate Thumbprint Cookies
Beverage matches: These cookies pair beautifully with coffee the bitterness balances the sweetness perfectly. Try them with a cappuccino, latte, or even espresso. For tea lovers, Earl Grey or chai provide complementary flavors. Hot chocolate creates an indulgent double-chocolate experience.
For an adult gathering, serve with dessert coffee or port. The cookies are rich enough to stand up to these stronger beverages.
Dessert presentations: Arrange chocolate thumbprint cookies on a tiered serving platter mixed with other cookie varieties for a beautiful dessert spread. Dust the serving platter with powdered sugar for an elegant touch. Place each cookie in a mini cupcake liner for individual servings at parties.
Ice cream accompaniment: Serve 2-3 cookies alongside a scoop of vanilla bean, salted caramel, or mint chocolate chip ice cream. The contrast of warm cookies (if served fresh from the oven) and cold ice cream is heavenly.
Holiday and party ideas: For Christmas, fill with red and green chocolate or add p