Hi, I’m Sam, and I remember the first time I tasted an orange creamsicle cheesecake at a family reunion. The combination of tangy citrus and creamy vanilla took me right back to childhood summers spent chasing the ice cream truck. That moment inspired me to create a no-bake version that captures that same nostalgic magic without heating up the kitchen. At dishfoody.com, I share flavorful, feel-good recipes made to make life in the kitchen easier and more joyful, and this No-Bake Orange Creamsicle Cheesecake is exactly that a dessert that brings people together with minimal effort and maximum flavor.
Are you tired of turning on your oven during sweltering summer days just to satisfy your sweet tooth? Does the thought of complicated baking techniques make you want to skip dessert altogether? I understand that struggle. Summer should be about enjoying the sunshine, not slaving over a hot stove. That’s why this No-Bake Orange Creamsicle Cheesecake is the answer to your dessert dilemma.
This recipe promises a silky-smooth, citrus-infused cheesecake that tastes like your favorite childhood frozen treat but in elegant dessert form. The bright orange flavor combined with the creamy vanilla base creates a refreshing finish to any summer meal. Whether you’re hosting a backyard barbecue, attending a potluck, or simply craving something sweet after dinner, this dessert delivers impressive results without requiring any baking skills.
As someone who has spent years perfecting no-bake desserts at dishfoody.com, I’ve tested countless cheesecake recipes to find the perfect balance of texture and flavor. This No-Bake Orange Creamsicle Cheesecake has become one of my most requested recipes, loved by both kids and adults alike. The secret lies in using fresh orange juice and zest combined with a stabilized cream cheese filling that sets perfectly in the refrigerator.
Throughout this guide, you’ll discover everything you need to know about making this showstopping dessert. I’ll walk you through selecting the best ingredients for maximum flavor, share my foolproof technique for creating the perfect no-bake cheesecake texture, provide step-by-step instructions that even beginners can follow, and offer creative variations to customize this recipe to your taste. You’ll also find answers to common questions about storage, serving, and troubleshooting, ensuring your No-Bake Orange Creamsicle Cheesecake turns out perfectly every single time.
Why This No-Bake Orange Creamsicle Cheesecake Recipe Works
This No-Bake Orange Creamsicle Cheesecake stands out among summer desserts for several compelling reasons. The combination of convenience, flavor, and versatility makes it the perfect choice for both novice and experienced home cooks.
Requires No Oven or Special Equipment: Unlike traditional cheesecakes that demand precise oven temperatures and water baths, this no-bake version sets beautifully in your refrigerator. You won’t heat up your kitchen or stress about cracking tops just mix, chill, and serve.
Ready in Under 30 Minutes of Active Time: While the cheesecake needs several hours to set, your hands-on work takes less than half an hour. This efficiency makes it perfect for busy schedules when you want an impressive dessert without spending your entire day in the kitchen.
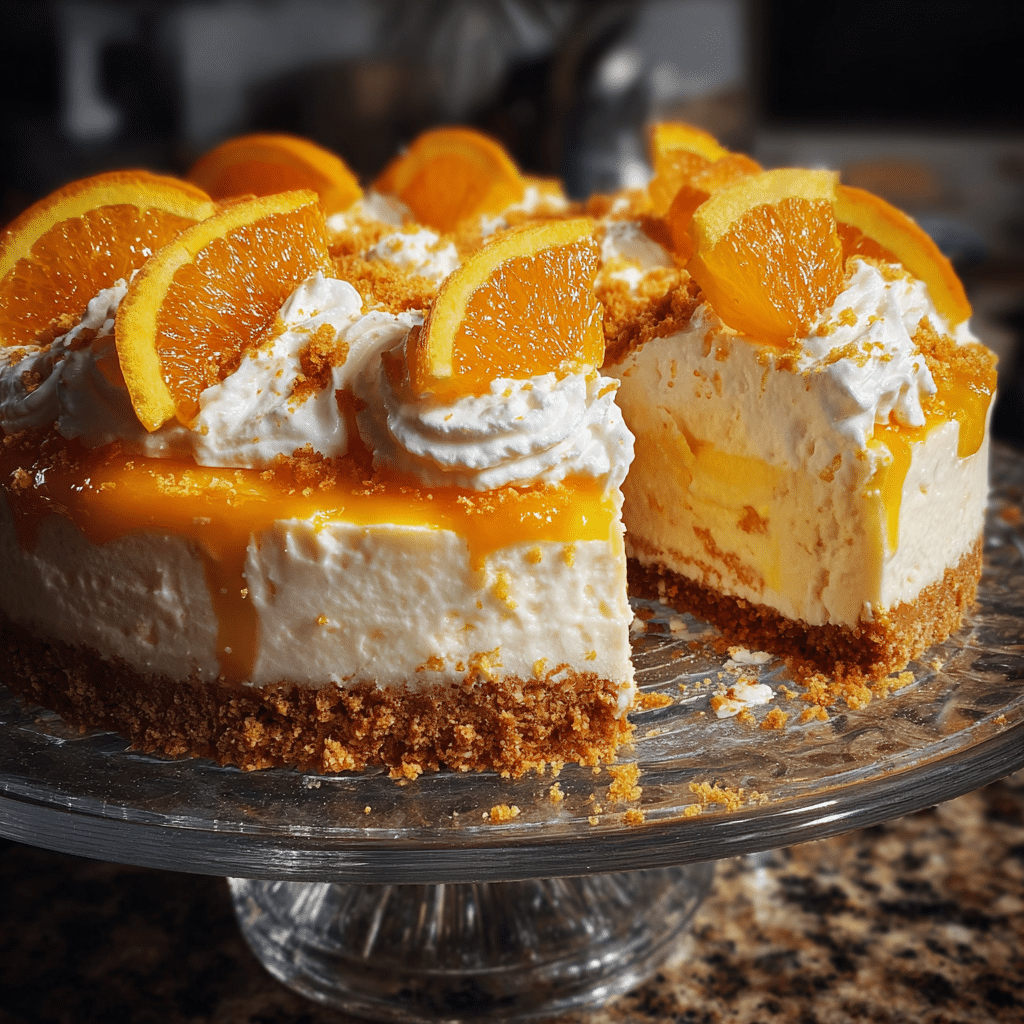
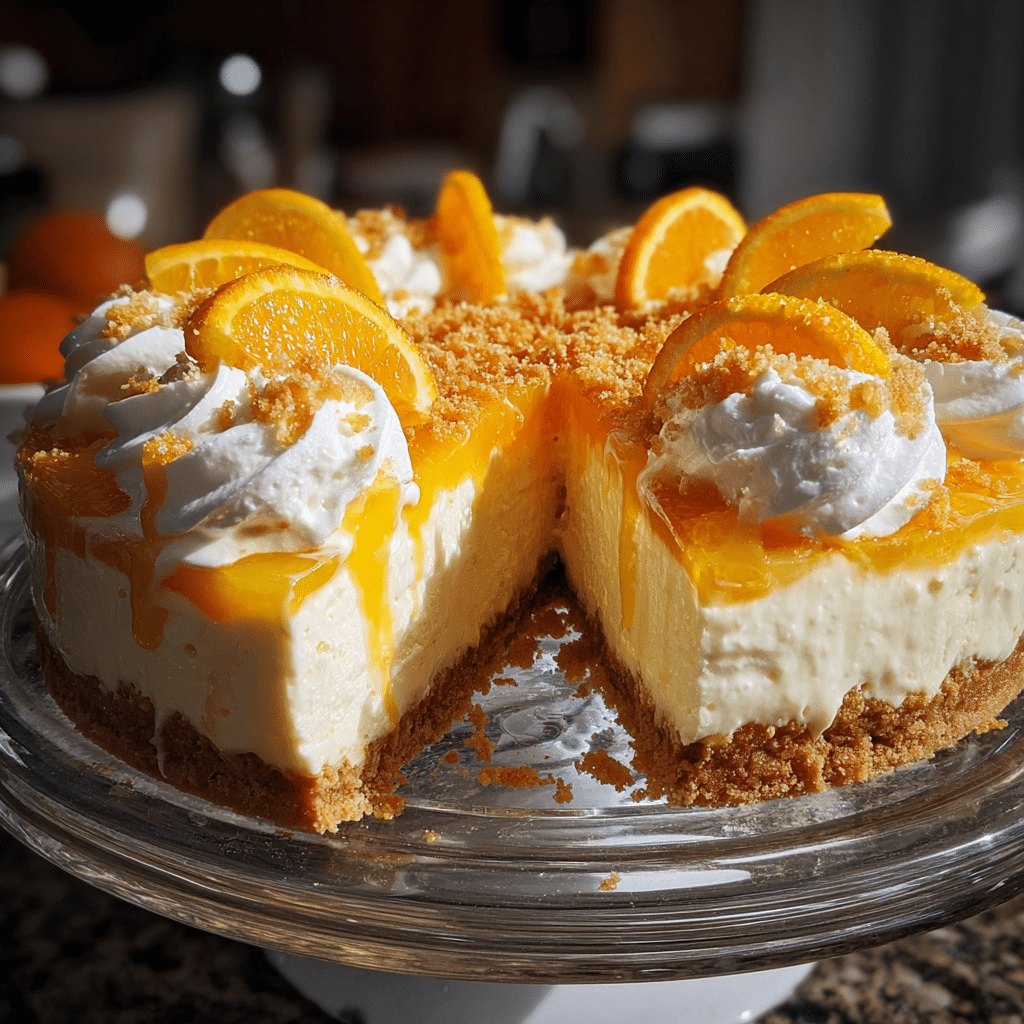
Captures Authentic Creamsicle Flavor: The recipe uses real orange juice and zest rather than artificial flavoring, creating that nostalgic orange-and-cream taste we all remember from childhood. The bright citrus notes perfectly balance the rich cream cheese base.
Feeds a Crowd Without Breaking the Budget: Using affordable, readily available ingredients, this dessert serves 10-12 people at a fraction of the cost of bakery cheesecakes. The simple ingredient list means you can make this beautiful dessert without specialty shopping trips.
Adaptable for Dietary Preferences: The basic recipe easily accommodates modifications for gluten-free, low-sugar, or even dairy-free variations. This flexibility ensures everyone at your gathering can enjoy a slice.
Make-Ahead Friendly for Stress-Free Entertaining: You can prepare this No-Bake Orange Creamsicle Cheesecake up to two days in advance, freeing you to focus on other dishes or simply relax before guests arrive. The flavor actually improves as it sits, making advance preparation a benefit rather than a compromise.
For more no-bake inspiration, check out my Peach Cobbler Cheesecake Recipe, which offers another delicious summer twist on classic cheesecake.
Choosing the Right Ingredients for No-Bake Orange Creamsicle Cheesecake
The success of your No-Bake Orange Creamsicle Cheesecake depends heavily on selecting quality ingredients. Each component plays a specific role in achieving the perfect texture and authentic creamsicle flavor.
Best Cream Cheese for This No-Bake Orange Creamsicle Cheesecake
Full-fat cream cheese forms the foundation of this dessert, providing the rich, tangy base that defines cheesecake. Always use brick-style cream cheese rather than spreadable varieties, which contain added stabilizers and excess moisture that prevent proper setting. The cream cheese must be at room temperature before mixing this typically takes 30-45 minutes on the counter. Softened cream cheese blends smoothly without lumps, creating that signature silky texture. Cold cream cheese will leave you with a grainy filling no matter how long you beat it.
Name-brand cream cheese generally produces more consistent results than store brands because of standardized fat content and manufacturing processes. However, if you prefer a store brand, choose one with at least 33% milk fat for the best flavor and texture. Avoid reduced-fat or fat-free cream cheese entirely these products lack the richness and stability needed for a proper no-bake cheesecake and often result in a watery, separated filling.
Selecting Fresh Oranges for Maximum Flavor
Fresh oranges make all the difference in this No-Bake Orange Creamsicle Cheesecake. Naval oranges work wonderfully for their sweet flavor and minimal seeds, but Valencia oranges also deliver excellent results with their juice content. Choose oranges that feel heavy for their size, indicating they’re full of juice. The skin should be firm and smooth without soft spots or excessive blemishes.
For the most vibrant orange flavor, you’ll need both juice and zest. The zest contains essential oils that provide concentrated citrus aroma and taste, while the juice adds brightness and necessary moisture. Always zest oranges before juicing it’s nearly impossible to zest a halved orange. Use a microplane or fine grater and only remove the colored outer layer, avoiding the bitter white pith underneath.
Plan on using 3-4 medium oranges to yield the 3/4 cup of juice and 2 tablespoons of zest this recipe requires. Fresh-squeezed juice tastes infinitely better than bottled varieties, which often have a cooked or processed flavor that doesn’t capture that authentic creamsicle taste.
Buying Tips for Heavy Cream and Other Dairy
Heavy whipping cream adds lightness and stability to the No-Bake Orange Creamsicle Cheesecake filling. Look for cream with at least 36% milk fat this higher fat content whips to firm peaks and holds its structure when folded into the cream cheese mixture. Check expiration dates carefully and choose the freshest option available since cream can develop off-flavors as it ages.
Avoid ultra-pasteurized cream if possible, as it doesn’t whip as well or hold peaks as firmly as regular pasteurized cream. However, ultra-pasteurized cream remains the only option in many areas and will still work adequately if whipped cold with chilled beaters in a cold bowl.
For the vanilla component that creates the “cream” half of the creamsicle flavor profile, use pure vanilla extract rather than imitation. Real vanilla provides depth and complexity that synthetic flavoring cannot match. The difference becomes especially noticeable in simple recipes like this where vanilla plays a prominent role.
Cookie Crust Selection and Substitutions
The crust for this No-Bake Orange Creamsicle Cheesecake traditionally uses graham crackers, which provide a slightly sweet, honeyed base that complements the citrus filling. Look for regular honey graham crackers rather than cinnamon or chocolate varieties. You’ll need about 1 1/2 cups of graham cracker crumbs, which equals approximately 10-12 full graham cracker sheets.
For a fun twist that enhances the creamsicle theme, substitute vanilla wafer cookies for the graham crackers. Vanilla wafers create a slightly sweeter crust with a flavor that echoes the vanilla cream component of the dessert. You’ll need about 2 cups of crushed vanilla wafers to replace the graham crackers.
Gluten-free diners can enjoy this dessert by using gluten-free graham crackers or vanilla wafers, which are now widely available in most grocery stores. Alternatively, create a nut-based crust using finely ground almonds or pecans mixed with melted butter and a touch of sugar.
Whichever cookie you choose, the crumbs should be fine and uniform. A food processor makes quick work of crushing cookies, but you can also place them in a sealed plastic bag and crush them with a rolling pin for a more rustic texture.
Ingredients & Prep for No-Bake Orange Creamsicle Cheesecake
Gathering and preparing your ingredients properly sets the stage for a flawless No-Bake Orange Creamsicle Cheesecake. Taking time with prep work ensures smooth execution when you begin assembling the dessert.
Essential Ingredients for the Crust
The foundation of this No-Bake Orange Creamsicle Cheesecake starts with a simple but delicious crust:
- 1 1/2 cups graham cracker crumbs (about 10-12 full sheets)
- 1/4 cup granulated sugar
- 6 tablespoons unsalted butter, melted
- Pinch of salt
The sugar sweetens the crust while the melted butter acts as a binder, holding the crumbs together when pressed into the pan. The small amount of salt enhances all the flavors without making the crust taste salty. Make sure your butter is fully melted and still warm when mixing with the crumbs this helps it distribute evenly and ensures the crust will hold its shape after chilling.
Core Ingredients for the Orange Cream Filling
The star of this No-Bake Orange Creamsicle Cheesecake is the luscious filling:
- 16 ounces cream cheese (two 8-ounce packages), softened to room temperature
- 1/2 cup granulated sugar
- 3/4 cup fresh orange juice
- 2 tablespoons orange zest (from about 2 medium oranges)
- 1 teaspoon pure vanilla extract
- 1 cup heavy whipping cream, cold
- 2 tablespoons powdered sugar
- 1 packet (2 1/4 teaspoons) unflavored gelatin
- 2 tablespoons water
The gelatin stabilizes the filling, ensuring it sets firmly enough to slice cleanly while maintaining a creamy, not rubbery, texture. This ingredient is crucial for no-bake cheesecakes without it, the filling remains too soft to slice properly. The combination of granulated sugar in the cream cheese mixture and powdered sugar in the whipped cream creates the ideal sweetness level while helping the cream hold its structure.
Preparing Your Workspace
Before you begin mixing, set up your workspace for efficiency. Remove the cream cheese from the refrigerator 30-45 minutes before starting so it reaches room temperature. This step cannot be rushed if you’re short on time, cut the cream cheese into smaller chunks to speed softening, but never microwave it as this creates uneven melting.
Zest your oranges first using a microplane, capturing those precious essential oils before they dry out. Then juice the oranges, straining out any seeds or large pulp pieces. Fresh juice should be used within a few hours for the brightest flavor, so prepare it close to when you’ll mix the filling.
Chill your mixing bowl and beaters in the freezer for 10-15 minutes before whipping the cream. Cold equipment helps cream whip faster and to firmer peaks. Also chill the heavy cream in the refrigerator until the moment you need it.
Prepare your springform pan by lightly spraying the bottom and sides with non-stick cooking spray, then lining the bottom with a circle of parchment paper. This dual approach ensures easy release when you remove the cheesecake from the pan. A 9-inch springform pan works perfectly for this recipe, creating a cheesecake with ideal proportions.
Marinating Time and Flavor Development
Unlike traditional cheesecakes that develop flavor through baking, this No-Bake Orange Creamsicle Cheesecake needs adequate chilling time for both texture and taste. The minimum refrigeration time is 4 hours, but overnight chilling (8-12 hours) produces superior results. During this time, the gelatin fully sets, the flavors meld together, and the crust firms up, making the cheesecake much easier to slice cleanly.
The orange flavor actually intensifies as the cheesecake chills because the essential oils from the zest infuse throughout the filling. What might taste slightly mild when first mixed will become beautifully vibrant after proper chilling. Plan your timeline accordingly if you’re serving this dessert for an evening gathering, make it the night before or early in the morning.
Similar to how my Red Velvet Cheesecake Recipe benefits from overnight chilling, this orange version reaches peak flavor and texture with patient refrigeration.
Step-by-Step Cooking Instructions for No-Bake Orange Creamsicle Cheesecake
Following these detailed instructions will guide you to a perfect No-Bake Orange Creamsicle Cheesecake every time. Each step builds on the previous one, so read through completely before beginning.
Pre-Cooking Prep for No-Bake Orange Creamsicle Cheesecake
Begin by preparing your springform pan as described earlier spray with non-stick spray and line the bottom with parchment paper. This preparation prevents sticking and makes removing the finished cheesecake much easier.
Next, create the crust by combining graham cracker crumbs, sugar, and salt in a medium bowl. Pour the melted butter over the mixture and stir with a fork until all the crumbs are evenly moistened. The mixture should resemble wet sand and hold together when squeezed. If it seems too dry, add an additional tablespoon of melted butter.
Pour the crust mixture into your prepared springform pan. Using the bottom of a measuring cup or glass, firmly press the crumbs into an even layer across the bottom of the pan and about one inch up the sides. Apply firm, even pressure to create a compact crust that won’t crumble when sliced. Place the pan in the refrigerator while you prepare the filling this head start on chilling helps the crust firm up.
Prepare the gelatin by sprinkling it over 2 tablespoons of cold water in a small microwave-safe bowl. Let it sit for 5 minutes to “bloom” during this time, the gelatin granules absorb the water and soften. After blooming, microwave the mixture for 10-15 seconds until the gelatin completely dissolves into a clear liquid. Set aside to cool slightly but not so long that it begins to set.
Cooking Method for No-Bake Orange Creamsicle Cheesecake Filling
In a large mixing bowl, beat the softened cream cheese with an electric mixer on medium speed for 2-3 minutes until completely smooth and creamy with no lumps. Scrape down the sides of the bowl as needed. Add the granulated sugar and beat for another minute until fully incorporated and fluffy.
Add the orange juice, orange zest, and vanilla extract to the cream cheese mixture. Beat on low speed initially to prevent splattering, then increase to medium speed and mix for about 1 minute until everything is well combined. The mixture will look slightly thin at this stage this is normal.
Pour the dissolved gelatin into the cream cheese mixture and beat on medium speed for 30 seconds to distribute it evenly throughout the filling. The gelatin must be incorporated quickly and thoroughly while still liquid, as it will begin to set if it cools too much.
In a separate chilled bowl with chilled beaters, whip the cold heavy cream with the powdered sugar on medium-high speed. Start slowly to prevent splattering, then increase the speed gradually. Whip until stiff peaks form—this means when you lift the beaters, the cream stands up in firm peaks that hold their shape without drooping. This process takes 2-4 minutes depending on your mixer and how cold your cream and equipment are. Be careful not to over-whip, which turns cream grainy and eventually into butter.
Using a large rubber spatula, gently fold about one-third of the whipped cream into the orange cream cheese mixture. This initial addition lightens the dense cream cheese base, making it easier to incorporate the remaining whipped cream. Use a folding motion cut down through the center, sweep across the bottom, and bring the spatula up along the side of the bowl. Rotate the bowl slightly and repeat until just combined.
Add the remaining whipped cream and continue folding gently until no white streaks remain. The goal is to maintain as much airiness as possible from the whipped cream while thoroughly combining everything. Over-mixing will deflate the cream and result in a denser cheesecake, so stop as soon as everything is uniform in color.
Assembly and Setting for No-Bake Orange Creamsicle Cheesecake
Remove the crust from the refrigerator and pour the orange cream filling over it. Use a spatula to spread it evenly, smoothing the top surface. Tap the pan gently on the counter a few times to release any air bubbles trapped in the filling.
Cover the cheesecake with plastic wrap, being careful not to let it touch the surface of the filling (you can place toothpicks around the edge to hold the plastic wrap up if needed). Alternatively, cover the entire springform pan with a large piece of plastic wrap or aluminum foil.
Refrigerate for at least 4 hours, though overnight (8-12 hours) produces the best texture and flavor. The cheesecake needs this time for the gelatin to fully set and the flavors to develop. Resist the temptation to check it too frequently—opening the refrigerator repeatedly affects the temperature and can extend the setting time.
Doneness Check for No-Bake Orange Creamsicle Cheesecake
Unlike baked cheesecakes that require temperature monitoring, this No-Bake Orange Creamsicle Cheesecake is “done” when it’s properly set in the refrigerator. After the minimum 4-hour chill time, gently touch the center of the cheesecake with a clean finger. It should feel firm and not leave an indentation. If it still seems soft or jiggly beyond a slight wobble, return it to the refrigerator for another 1-2 hours.
The edges will set before the center, so always test the middle portion. A properly set cheesecake will hold its shape when sliced and won’t ooze filling. If you’ve followed the recipe precisely and allowed adequate chilling time, your No-Bake Orange Creamsicle Cheesecake will be perfectly set and ready to serve.
Releasing from the Pan for No-Bake Orange Creamsicle Cheesecake
When you’re ready to serve, run a thin knife or offset spatula around the inside edge of the springform pan. This step releases any filling that may have adhered to the sides. Wipe the knife clean between passes to avoid dragging filling down the sides of the cheesecake.
Unlatch the springform pan collar and gently lift it straight up. If the cheesecake sticks, run the knife around the edge once more. The cheesecake should remain on the bottom of the pan, which makes it easy to transfer to a serving plate.
If you want to remove the metal bottom, carefully slide a large, flat spatula between the crust and the pan bottom, working your way around the entire cheesecake. With one swift motion, transfer the cheesecake to your serving plate. Alternatively, you can serve it directly from the pan bottom many bakers do this to avoid any risk of damaging the dessert.
For the cleanest slices, dip your knife in hot water and wipe it dry between each cut. The
PrintNo-Bake Orange Creamsicle Cheesecake: Best Summer Dessert Recipe
No-Bake Orange Creamsicle Cheesecake is a creamy, dreamy dessert with bright citrus flavor and a nostalgic twist. Layers of orange and vanilla come together in a luscious cheesecake, perfect for summer parties or easy weeknight indulgence.
- Prep Time: 20 mins
- Cook Time: 0 mins
- Total Time: 6 hours
- Yield: 8 servings 1x
- Category: Dessert
- Method: No-Bake
- Cuisine: American
- Diet: Vegetarian
Ingredients
- 2 cups graham cracker crumbs
- 1/2 cup unsalted butter, melted
- 16 oz cream cheese, softened
- 1 cup powdered sugar
- 1/2 cup orange juice
- 2 tbsp orange zest
- 1 tsp vanilla extract
- 1 cup heavy cream, whipped
- Optional: orange slices or zest to garnish
Instructions
- 1. Combine graham cracker crumbs and melted butter, press into bottom of a 9-inch springform pan.
- 2. Beat cream cheese until smooth, add powdered sugar, orange juice, orange zest, and vanilla extract; mix until combined.
- 3. Fold in whipped heavy cream gently.
- 4. Spoon over crust and smooth top.
- 5. Chill for at least 6 hours, or overnight, until set.
- 6. Garnish with orange slices or zest before serving.
Notes
- For gluten-free, use GF graham crackers.
- Add more zest for a punchier flavor.
- Double for a tall layered cheesecake.
- Keeps well refrigerated up to 3 days.
Nutrition
- Serving Size: 1 slice
- Calories: 320
- Sugar: 24g
- Sodium: 180mg
- Fat: 20g
- Saturated Fat: 11g
- Unsaturated Fat: 8g
- Trans Fat: 0g
- Carbohydrates: 32g
- Fiber: 1g
- Protein: 4g
- Cholesterol: 60mg
Keywords: no-bake orange cheesecake, creamsicle dessert, summer cheesecake, easy orange cheesecake