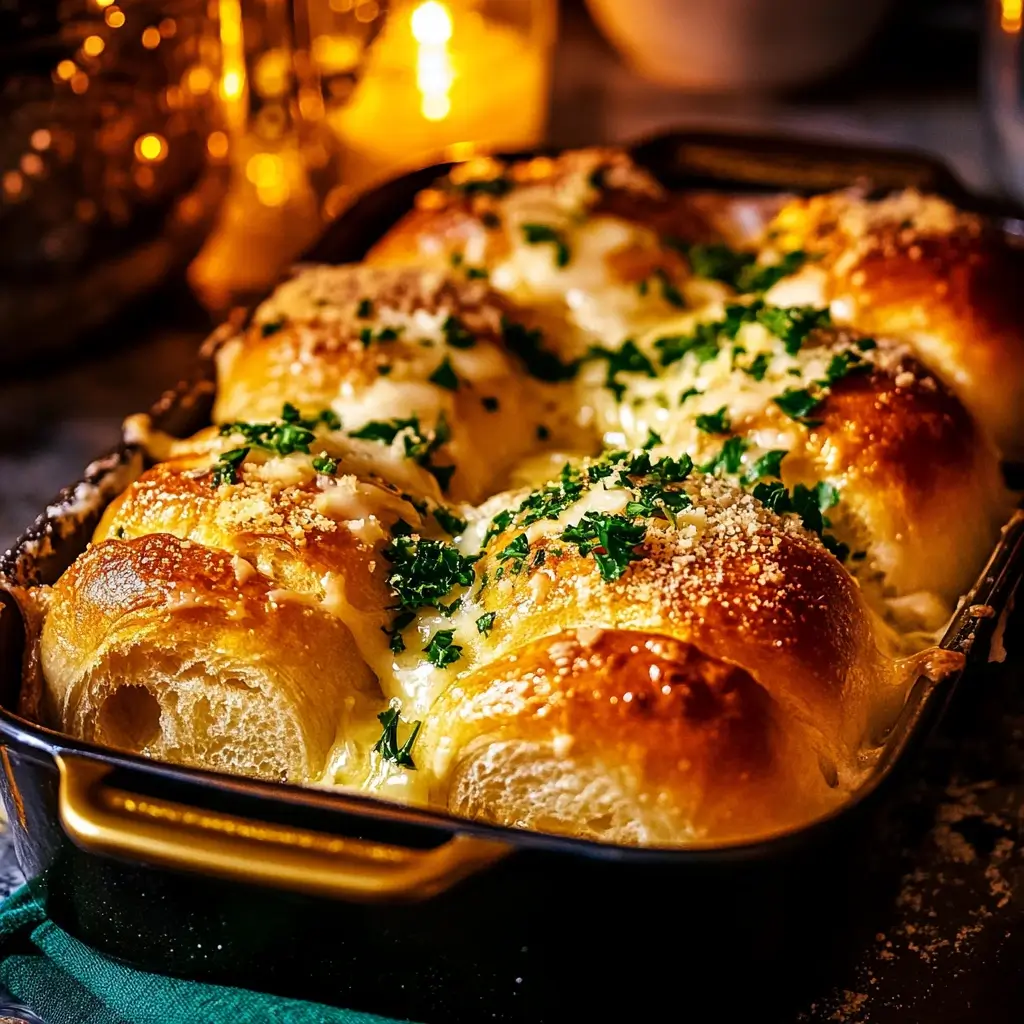
Garlic bread rolls have been my go-to crowd-pleaser ever since I started dishfoody.com, and honestly, I can’t imagine a dinner table without them. Hi, I’m Sam, and if you’ve ever found yourself staring at a basket of store-bought dinner rolls thinking “these could be so much better,” you’re absolutely right—and you’re in the right place!
Last month, I was hosting a dinner party and realized I’d completely forgotten about bread. With guests arriving in an hour, I threw together what would become my most-requested recipe: these buttery, garlicky, absolutely irresistible rolls that take just 15 minutes to prep. The magic happens when that garlic butter mixture gets into every nook and cranny, creating pockets of flavor that’ll have everyone asking for seconds (and thirds, and the recipe).
At dishfoody.com, I believe cooking should bring joy, not stress. This garlic bread rolls recipe embodies that philosophy perfectly—it’s foolproof enough for beginners but delivers restaurant-quality results that’ll make you look like a kitchen wizard. We’ll cover everything from choosing the right dough to pro tips that ensure perfect golden-brown rolls every single time, plus some flavor variations that’ll keep this recipe fresh for every occasion.
Why This Garlic Bread Rolls Recipe Works
These aren’t your ordinary dinner rolls—they’re flavor bombs disguised as bread. After testing countless variations over the years, I’ve perfected this recipe to deliver maximum impact with minimal effort.
• Uses affordable, pantry-friendly ingredients: No specialty items or expensive artisan butter required—just simple ingredients that create extraordinary flavor • Ready in under 30 minutes: From prep to plate, you’ll have warm, aromatic rolls on the table faster than ordering takeout • Perfect for any occasion: Whether it’s a casual weeknight dinner, holiday feast, or last-minute entertaining, these rolls elevate every meal • Foolproof technique: The muffin tin method ensures even cooking and perfectly portioned rolls every time • Make-ahead friendly: Prep the butter mixture days in advance, or freeze unbaked rolls for fresh bread anytime
Choosing the Right Dough for Your Garlic Bread Rolls Recipe
The foundation of great garlic bread rolls starts with selecting the right base. While I’ve tested everything from scratch dough to frozen options, here’s what works best for different situations.
Best Dough Options for This Recipe
Refrigerated Biscuit Dough: This is my go-to choice for speed and consistency. The layers in biscuit dough create perfect pockets for the garlic butter to nestle into. Look for brands like Pillsbury or store brands—they all work beautifully. The key is using the “flaky” varieties rather than “buttermilk” for better texture.
Dinner Roll Dough: If you prefer a more traditional bread texture, refrigerated dinner roll dough works excellently. It’s slightly denser than biscuit dough but absorbs the garlic butter mixture beautifully. Perfect for those who want a more substantial roll.
Homemade Bread Dough: For the ultimate from-scratch experience, use your favorite yeast roll recipe. The extra effort pays off in flavor and texture, plus you control every ingredient.
Buying Tips
When shopping for dough, check the expiration date carefully—fresh dough yields better rise and texture. Keep refrigerated dough cold until you’re ready to use it, and if it’s been sitting in your fridge for a week, it’s time for a new container. For the best results, bring the dough to room temperature for about 10 minutes before working with it—this makes it easier to handle and helps achieve even baking.
Substitutions
Frozen Bread Dough: Thaw completely and let rise according to package directions before using. Works great but requires more planning time.
Pizza Dough: Surprisingly excellent! The slightly chewier texture holds up well to the butter mixture. Use about 1 pound of dough, divided into 12 pieces.
English Muffin Dough: Creates a more rustic, artisanal look with amazing texture for soaking up that garlic butter.
Ingredients & Prep for Perfect Garlic Bread Rolls Recipe
Getting your ingredients right and prepped properly makes the difference between good rolls and absolutely incredible ones. Here’s everything you need to know.
Essential Ingredients Breakdown
For the Rolls (Makes 12):
- 1 can refrigerated biscuit dough (or 12 dinner rolls)
- 4 tablespoons unsalted butter, melted
- 3-4 cloves garlic, minced (adjust to taste)
- 1 teaspoon Italian seasoning
- 2 tablespoons fresh parsley, chopped (or 1 teaspoon dried)
- 1/4 cup grated Parmesan cheese (optional but recommended)
- Pinch of salt
Prep Essentials for Garlic Bread Rolls
Garlic Preparation: Fresh garlic makes all the difference here. Use a microplane grater or garlic press for the finest mince—this ensures even distribution and prevents burning. If you’re sensitive to raw garlic, you can briefly sauté the minced garlic in a teaspoon of the melted butter for 30 seconds to mellow it out.
Butter Mixture Magic: The key to perfect garlic bread rolls lies in your butter mixture. Melt the butter gently—don’t let it get too hot, as this can cook the garlic when you mix it in. The ideal temperature feels just warm to the touch. Mix all seasonings into the melted butter and let it sit for 5 minutes to allow the flavors to meld.
Make-Ahead Tips: This butter mixture actually improves with time. You can make it up to 3 days ahead and store it covered in the refrigerator. Just gently reheat it until it’s liquid again before using.
Pantry Staples That Make the Difference
Italian Seasoning: Use a good-quality blend, or make your own with equal parts dried oregano, basil, thyme, and rosemary. Fresh herbs work too—use about 1 tablespoon total of mixed fresh herbs instead of the dried.
Parmesan Cheese: While listed as optional, I highly recommend it. Use freshly grated for the best flavor and texture. The pre-grated stuff in the green container works in a pinch, but fresh makes these rolls shine.
Salt Balance: Just a pinch enhances all the other flavors without making the rolls taste salty. If you’re using salted butter, you might skip this entirely.
Step-by-Step Cooking Instructions for Garlic Bread Rolls Recipe
Perfect garlic bread rolls follow a simple but specific process. Here’s exactly how to achieve golden, buttery perfection every time.
Pre-Cooking Prep for Garlic Bread Rolls
Start by preheating your oven to 375°F (190°C)—this temperature gives you the perfect balance of cooked-through centers and golden-brown exteriors. Lightly grease a 12-cup muffin tin with butter or cooking spray. The muffin tin method is game-changing because it keeps the rolls perfectly shaped and prevents them from spreading into each other.
Prepare your garlic butter mixture by combining melted butter, minced garlic, Italian seasoning, parsley, and salt in a small bowl. Stir in the Parmesan cheese if using. Let this mixture sit while you prep the dough—the flavors will intensify beautifully.
Cooking Method for Garlic Bread Rolls
Remove the biscuit dough from the package and separate into individual pieces. If you’re using biscuit dough, cut each biscuit in half to create 24 smaller pieces—this creates more surface area for the garlic butter and ensures even cooking. Roll each piece into a smooth ball using your palms.
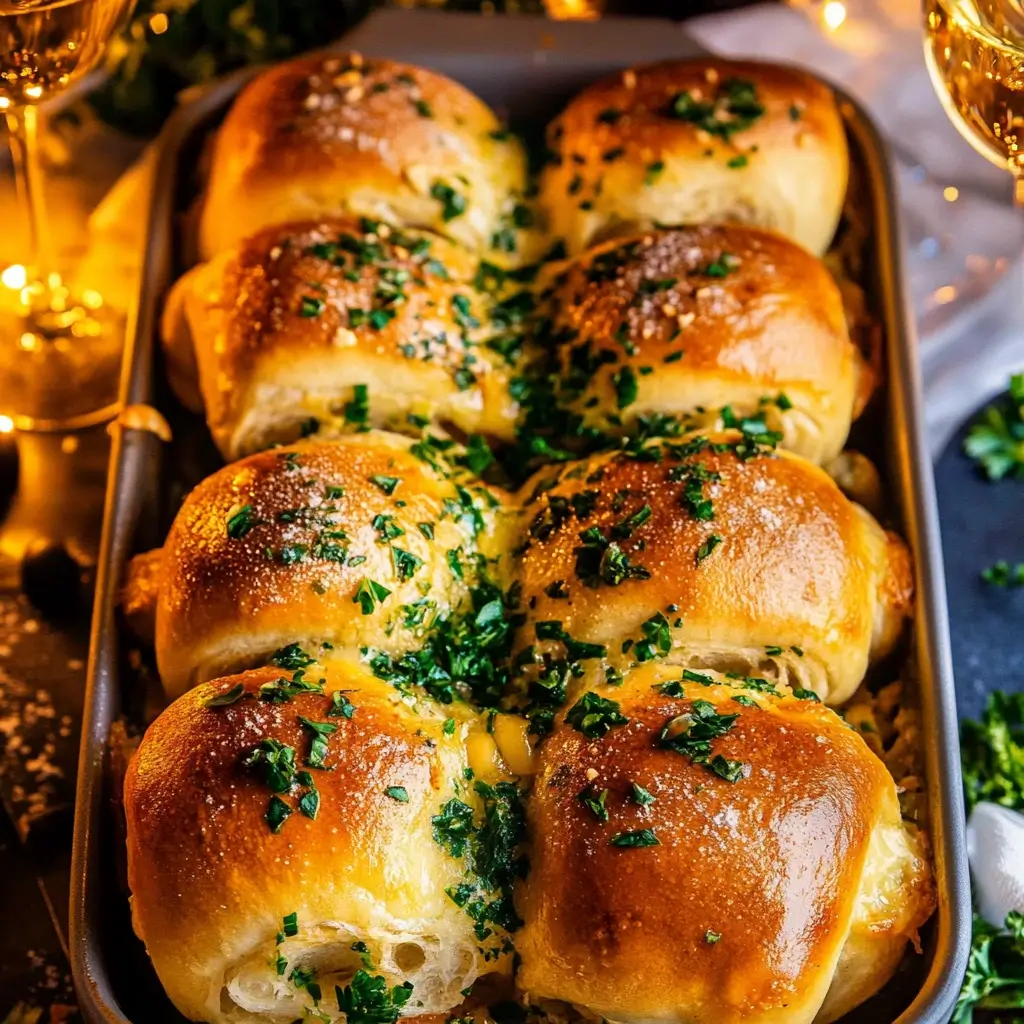
Here’s the crucial step: dip each dough ball completely into the garlic butter mixture, making sure it’s well coated. Place 2-3 coated pieces into each muffin cup, depending on their size. Don’t worry if they look a bit crowded—they’ll puff beautifully as they bake and create that pull-apart texture we’re after.
Doneness Check for Garlic Bread Rolls
Bake for 12-15 minutes, checking at the 12-minute mark. Look for a rich golden-brown color on top—they should look like they’re glowing with that buttery sheen. The internal temperature should reach 190°F if you want to be precise, but visual cues work perfectly here.
Proper Resting for Garlic Bread Rolls
Let the rolls rest in the muffin tin for 2-3 minutes before removing—this brief rest allows the structure to set so they don’t fall apart when you take them out. Use a butter knife to gently loosen the edges if needed, then turn them out onto a serving platter.
Immediately brush with any remaining garlic butter mixture while they’re still hot—this creates that glossy, irresistible finish and adds an extra layer of flavor.
Pro Tips for Perfect Garlic Bread Rolls Recipe
After making these rolls hundreds of times (and teaching countless others to make them), I’ve learned the secrets that separate good from extraordinary.
Avoiding Common Mistakes with Garlic Bread Rolls
Don’t Overmix the Dough: Handle the dough gently when forming balls. Overworking creates tough, dense rolls instead of light, fluffy ones. A few gentle rolls between your palms is all you need.
Temperature Matters: Make sure your garlic butter mixture isn’t too hot when you dip the dough—hot butter can start cooking the dough prematurely, leading to uneven texture. Aim for just warm to the touch.
Even Coating is Key: Take time to ensure each piece is well-coated with the butter mixture. This isn’t just about flavor—the butter creates steam during baking that helps create that tender, fluffy interior.
Essential Tool Recommendations for Garlic Bread Rolls
12-Cup Muffin Tin: Non-stick or well-seasoned works best. This shape gives you perfectly portioned rolls and prevents spreading.
Microplane Grater: For the finest garlic mince that distributes evenly without burning.
Small Mixing Bowl: Deep enough to easily dip the dough pieces without making a mess.
Pastry Brush: For applying that final layer of garlic butter—though a spoon works in a pinch.
Storage & Reheating Your Garlic Bread Rolls
Same Day: Keep covered with a kitchen towel at room temperature for up to 4 hours. They’re best served warm, so pop them in a 300°F oven for 3-4 minutes to refresh.
Next Day: Store in an airtight container and reheat in a 350°F oven for 5-7 minutes. You can brush them with a bit more melted butter before reheating for extra richness.
Freezing: These freeze beautifully! Wrap cooled rolls individually in plastic wrap, then store in a freezer bag for up to 3 months. Thaw at room temperature and reheat as above.
Flavor Variations for Your Garlic Bread Rolls Recipe
One of the things I love most about this recipe is how easily it adapts to different flavor profiles and dietary needs. Here are my favorite tested variations.
Spicy Twist on Garlic Bread Rolls
Add 1/4 teaspoon red pepper flakes to your butter mixture, or try a pinch of cayenne for heat without the texture. For a smoky kick, use 1/2 teaspoon smoked paprika. My personal favorite is adding 1 teaspoon of finely minced jalapeño to the butter mixture—it gives just enough heat to wake up your taste buds without overwhelming the garlic.
Dietary-Friendly Garlic Bread Rolls Variations
Keto/Low-Carb: Use fathead dough (mozzarella and almond flour based) instead of regular dough. The butter mixture works perfectly with this substitution, though baking time increases to 18-20 minutes.
Dairy-Free: Replace butter with high-quality olive oil or vegan butter. The flavor changes but remains delicious. Add an extra pinch of salt to enhance the flavors.
Gluten-Free: Use your favorite gluten-free biscuit or roll dough. Cup4Cup and King Arthur both make excellent options that work beautifully with this recipe.
Global Flavors for Garlic Bread Rolls
Mediterranean Style: Replace Italian seasoning with oregano, add sun-dried tomatoes (finely chopped), and include crumbled feta cheese instead of Parmesan.
Asian-Inspired: Mix 1 teaspoon sesame oil into the butter, add minced ginger along with the garlic, and finish with sesame seeds instead of parsley.
Mexican Fiesta: Add cumin, chili powder, and lime zest to the butter mixture. Finish with cotija cheese and fresh cilantro.
| Variation | Key Additions | Flavor Profile | Best Served With |
|---|---|---|---|
| Classic Herb | Italian seasoning, parsley, Parmesan | Savory, aromatic | Italian dishes, roasted meats |
| Spicy Kick | Red pepper flakes, smoked paprika | Bold, smoky heat | BBQ, Mexican food |
| Mediterranean | Oregano, sun-dried tomatoes, feta | Bright, tangy | Greek salads, grilled fish |
| Asian Fusion | Sesame oil, ginger, sesame seeds | Nutty, aromatic | Stir-fries, Asian soups |
| Mexican Fiesta | Cumin, chili powder, lime, cilantro | Zesty, warm spice | Tacos, enchiladas |
Serving Suggestions for Your Garlic Bread Rolls Recipe
These versatile rolls complement virtually any meal, but some pairings are absolutely magical. Here’s how to make the most of them.
Perfect Food Pairings
With Italian Cuisine: Serve alongside spaghetti and meatballs, lasagna, or chicken parmesan. The buttery richness cuts through tomato-based sauces beautifully while the garlic ties everything together.
Holiday Dinners: These rolls steal the show at Thanksgiving and Christmas tables. They pair wonderfully with roasted turkey, glazed ham, and all the traditional sides. The herbs complement sage stuffing perfectly.
Comfort Food Classics: Serve with hearty soups like minestrone, beef stew, or creamy chicken and dumplings. The rolls are perfect for soaking up every last drop of delicious broth.
Grilled Meals: Fire up the grill and serve these alongside grilled steaks, barbecued chicken, or grilled vegetables. The indoor preparation means you can have fresh bread without heating up additional outdoor space.
Beverage Pairings
Wine: A crisp Pinot Grigio complements the herbs without competing with the garlic. For red wine lovers, a light Chianti works beautifully with the Italian flavors.
Beer: Wheat beers like Hefeweizen provide a clean, refreshing contrast to the rich butter. For something more robust, try a Belgian-style ale.
Non-Alcoholic: Sparkling water with lemon cleanses the palate between bites, while iced tea (unsweetened) provides a classic comfort-food pairing.
Frequently Asked Questions About Garlic Bread Rolls Recipe
Over the years, I’ve received hundreds of questions about this recipe. Here are the most common ones with detailed answers.
Can I use frozen dough for my garlic bread rolls recipe?
Absolutely! Frozen bread dough works wonderfully, though it requires more planning. Thaw the dough completely in the refrigerator overnight, then let it come to room temperature for about 30 minutes before using. You might need to let it rise slightly after shaping, which adds about 20-30 minutes to your total time, but the results are worth it.
How do I prevent my garlic bread rolls from getting soggy?
The key is in the butter mixture consistency and baking temperature. Make sure your butter is melted but not hot, and don’t over-saturate the dough pieces. Bake at the full 375°F—lower temperatures cause the rolls to absorb too much butter before they set properly. Also, serve them within an hour of baking for the best texture.
Can I make garlic bread rolls ahead of time?
Yes, with a few strategies. You can assemble the unbaked rolls, cover them tightly, and refrigerate for up to 24 hours before baking—just add 2-3 minutes to the baking time. For longer storage, freeze the assembled, unbaked rolls on a baking sheet, then transfer to freezer bags. Bake directly from frozen, adding 5-7 minutes to the cooking time.
What’s the best way to reheat leftover garlic bread rolls?
Never use the microwave—it makes them tough and chewy. Instead, wrap them loosely in foil and warm in a 350°F oven for 5-7 minutes. For extra richness, brush them with a little melted butter before reheating. They’ll taste almost as good as fresh!
Are these garlic bread rolls safe during pregnancy?
Yes, this recipe is completely safe for pregnant women. All ingredients are cooked to safe temperatures, and there are no raw eggs or unpasteurized dairy products. The garlic is perfectly safe and might even help with pregnancy-related nausea for some women.
Can I double this garlic bread rolls recipe?
Definitely! This recipe doubles beautifully. You’ll need two muffin tins and should double all ingredients proportionally. The baking time remains the same, but you might need to rotate the pans halfway through for even browning. This is perfect for large gatherings or holiday meals.
Conclusion
These garlic bread rolls have become more than just a recipe at dishfoody.com—they’re a gateway to creating those warm, connecting moments that make cooking so meaningful. Whether you’re making them for a quiet family dinner or a bustling holiday celebration, they bring people together around the table in the most delicious way possible.
Fire up your oven and try this recipe tonight! There’s something magical about the aroma of garlic and butter that fills your kitchen, and the satisfied faces around your table when these golden beauties make their appearance. Trust me, once you see how easy it is to create restaurant-quality rolls at home, you’ll never look at store-bought dinner rolls the same way again.
Join the thousands of home cooks who’ve made this their go-to bread recipe—and don’t forget to share your results! I love seeing how this recipe brings joy to kitchens around the world. Looking for more crowd-pleasing recipes? Try our Garlic Parmesan Chicken Skewers or Hot Dog Nuggets Recipe to expand your bread-baking repertoire. Happy cooking!