Red velvet brownies might just be the answer to your dessert prayers if you’ve ever found yourself torn between classic chocolate brownies and the elegant allure of red velvet cake. Hi, I’m Sam from dishfoody.com, and I have to tell you about the day I accidentally created what my family now calls “the best brownies ever made.”
It was a rainy Tuesday evening, and I was craving something indulgent but didn’t want to commit to a full layer cake. I had red velvet cake mix staring at me from the pantry, but my heart was set on brownies. That’s when inspiration struck – why not combine the best of both worlds? After several kitchen experiments (and a few happy taste-testers), I perfected this red velvet brownies recipe that delivers all the fudgy richness you crave with that distinctive red velvet flavor and stunning color.
This recipe promises brownies that are impossibly fudgy, visually stunning, and carry that subtle cocoa-vanilla flavor profile that makes red velvet so beloved. As someone who’s spent years perfecting comfort desserts at dishfoody.com, I can confidently say these brownies will become your new go-to treat. We’ll cover everything from ingredient selection to pro decorating tips, plus I’ll share the secret to that perfect cream cheese swirl that makes these brownies absolutely irresistible.
Why This Red Velvet Brownies Recipe Works
Creating the perfect red velvet brownies isn’t just about adding food coloring to regular brownie batter – there’s actual science behind what makes these special. After testing dozens of variations, I’ve discovered the key elements that make this recipe consistently successful:
• Uses the perfect cocoa-to-flour ratio: Unlike traditional brownies that are heavily chocolate-forward, red velvet requires a more delicate balance. The small amount of cocoa powder gives you that subtle chocolate flavor without overwhelming the characteristic red velvet taste.
• Achieves fudgy texture in just 30 minutes: The melted butter method combined with the right sugar ratio creates incredibly moist, fudgy brownies that never turn out cakey or dry.
• Foolproof for beginners yet impressive enough for special occasions: This recipe uses simple mixing methods and common ingredients, but the stunning visual impact and sophisticated flavor make it perfect for everything from family dinners to holiday gatherings.
• Customizable with endless variations: The base recipe is sturdy enough to handle mix-ins like white chocolate chips, nuts, or even a cream cheese swirl that transforms these into bakery-worthy treats.
Choosing the Right Ingredients for Red Velvet Brownies
The success of your red velvet brownies depends heavily on using quality ingredients and understanding why each component matters. Let me walk you through the key players:
Essential Ingredients for Perfect Red Velvet Brownies
Cocoa Powder: This is where many home bakers go wrong. You want unsweetened cocoa powder, not hot chocolate mix or sweetened cocoa. The amount is crucial – too much and you’ll overpower the delicate red velvet flavor, too little and you’ll miss that subtle chocolate note entirely.
Food Coloring: While some purists argue against it, the distinctive red color is part of red velvet’s charm. I prefer gel food coloring over liquid because it provides more vibrant color without thinning the batter. Start with one tablespoon and adjust to your preference.
Butter Quality: Use real unsalted butter, not margarine. The butter should be melted and slightly cooled – hot butter can cook the eggs when mixed in. This is what gives us that dense, fudgy texture we’re after.
Shopping Tips for Red Velvet Brownies Success
When shopping for your red velvet brownies ingredients, look for these quality markers: fresh eggs (check the expiration date), high-quality vanilla extract (not imitation), and cocoa powder that’s been stored properly (it should smell rich, not musty). For the cream cheese swirl, choose full-fat cream cheese – low-fat versions won’t provide the right texture or flavor.
Smart Substitutions for Red Velvet Brownies
While I always recommend following the recipe as written for best results, here are some tested substitutions: swap the granulated sugar for coconut sugar (though the texture will be slightly different), use coconut oil instead of butter for dairy-free brownies, or replace regular flour with a 1:1 gluten-free flour blend for those with dietary restrictions.
Ingredients & Prep for Red Velvet Brownies
Getting your red velvet brownies ingredients properly prepped is half the battle won. Here’s how to set yourself up for success:
Red Velvet Brownies Prep Essentials
Mise en place is everything: Before you even turn on your oven, measure out all ingredients. This prevents the common mistake of adding too much cocoa powder or forgetting the salt entirely. Room temperature ingredients mix more evenly, so take your eggs out of the fridge 30 minutes before baking.
Pan preparation matters: Line your 8×8-inch pan with parchment paper, leaving overhang for easy removal. This prevents sticking and makes cutting clean squares much easier. If you only have a 9×9-inch pan, reduce the baking time by 3-5 minutes and watch carefully.
The Perfect Red Velvet Brownies Batter
Mixing technique: Unlike traditional brownies where you might cream butter and sugar, this red velvet brownies recipe uses the melt-and-mix method. Whisk the melted butter and sugar until just combined, then add eggs one at a time. The key is not to overmix once you add the flour – this keeps the brownies tender.
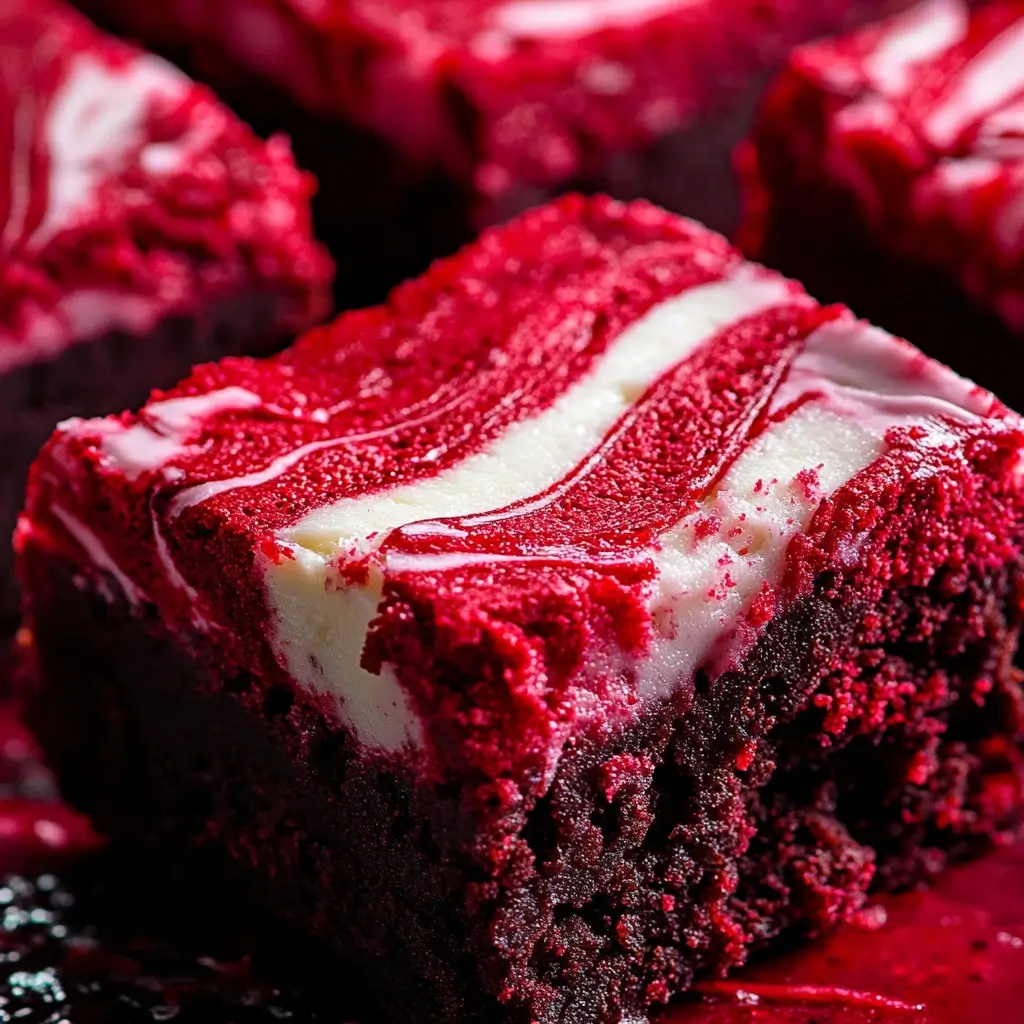
Cream cheese swirl preparation: If you’re making the optional cream cheese swirl (and I highly recommend you do), make sure your cream cheese is truly softened. Hard cream cheese creates lumps that won’t smooth out no matter how much you beat it.
Essential Tools for Red Velvet Brownies
You don’t need fancy equipment, but having the right tools makes the process smoother: a good whisk for combining wet ingredients, a rubber spatula for gentle folding, and a toothpick for testing doneness. A kitchen scale is helpful for consistent results, but cup measurements work perfectly fine too.
Step-by-Step Cooking Instructions for Red Velvet Brownies
Let me walk you through creating these perfect red velvet brownies from start to finish:
Pre-Cooking Prep for Red Velvet Brownies
Temperature and timing setup: Preheat your oven to 350°F (175°C) and position the rack in the center. This ensures even baking for your red velvet brownies. Line your 8×8-inch pan with parchment paper, creating a sling with overhang for easy removal.
Ingredient preparation: Melt your butter and let it cool slightly while you measure other ingredients. This prevents the hot butter from cooking the eggs when mixed. If making the cream cheese swirl, ensure your cream cheese is completely softened – microwave for 10-15 seconds if needed.
Cooking Method for Red Velvet Brownies
Creating the base: In a large bowl, whisk together the melted butter and granulated sugar until well combined. The mixture should be smooth and glossy. Add eggs one at a time, beating well after each addition, then stir in vanilla extract and red food coloring until the color is evenly distributed.
Dry ingredient incorporation: In a separate bowl, whisk together cocoa powder, flour, and salt. This prevents lumps and ensures even distribution. Add the dry ingredients to the wet mixture, stirring just until combined. Don’t overmix – a few streaks of flour are fine.
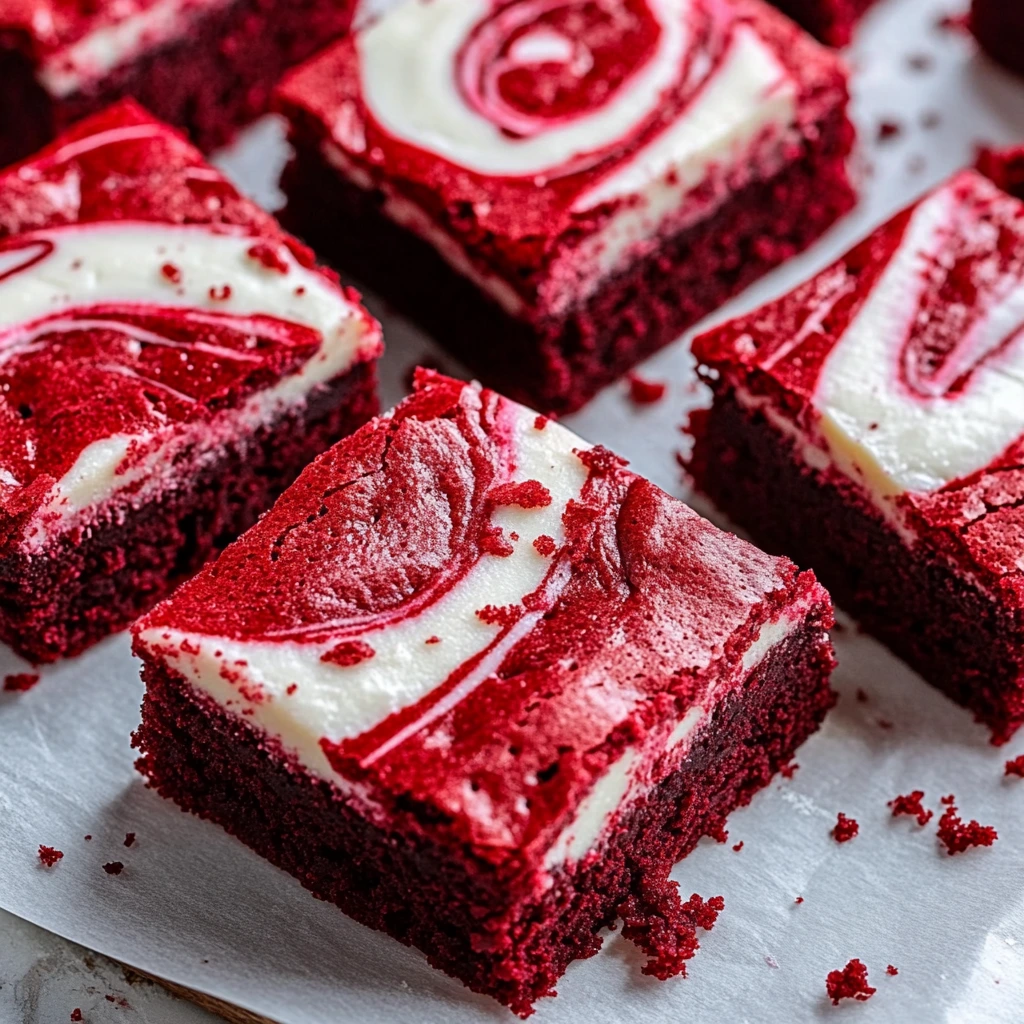
Assembly process: Pour the red velvet brownies batter into your prepared pan, spreading it evenly. If making the cream cheese swirl, drop spoonfuls of the cream cheese mixture on top and use a knife or toothpick to create swirl patterns.
Doneness Check for Red Velvet Brownies
Perfect timing: Bake for 25-30 minutes, but start checking at 25 minutes. The key to perfect red velvet brownies is not overbaking – they should be set around the edges but still slightly soft in the center.
Testing technique: Insert a toothpick about 1 inch from the center. It should come out with a few moist crumbs clinging to it, not completely clean. If it comes out wet with batter, bake for 2-3 more minutes and test again.
Resting Your Red Velvet Brownies
Cooling process: This is crucial for red velvet brownies – let them cool completely in the pan before cutting. This allows the texture to set properly and prevents crumbling. For clean cuts, refrigerate for 30 minutes before slicing.
Pro Tips for Perfect Red Velvet Brownies
After making countless batches of red velvet brownies, I’ve learned some game-changing techniques:
Avoiding Common Red Velvet Brownies Mistakes
Don’t overbake: The biggest mistake I see is overbaking because people expect the toothpick to come out completely clean. For fudgy red velvet brownies, you want those moist crumbs clinging to the toothpick.
Color consistency: Add the food coloring to the wet ingredients first, then mix thoroughly before adding dry ingredients. This ensures even color distribution throughout your brownies.
Swirl technique: When creating the cream cheese swirl, don’t overdo it. Three to four gentle swirls create the most beautiful pattern without muddying the colors.
Tool Recommendations for Red Velvet Brownies
Essential equipment: A good offset spatula makes spreading batter evenly much easier. Parchment paper is non-negotiable for easy removal. A bench scraper helps cut clean lines when portioning.
Storage solutions: Store your red velvet brownies in an airtight container at room temperature for up to 3 days. For longer storage, wrap individual squares in plastic wrap and freeze for up to 3 months.
Red Velvet Brownies Troubleshooting
Dry brownies: Usually caused by overbaking or too much flour. Next time, check doneness earlier and measure flour by weight if possible.
Uneven color: This happens when food coloring isn’t fully incorporated. Mix wet ingredients thoroughly before adding dry ingredients.
Flavor Variations for Red Velvet Brownies
One of the things I love most about this red velvet brownies base recipe is how adaptable it is:
Decadent Add-ins for Red Velvet Brownies
White chocolate lovers: Fold in ½ cup white chocolate chips or chunks for extra richness. The white chocolate complements the red velvet flavor beautifully and adds textural interest.
Nutty variations: Try chopped pecans or walnuts – about ½ cup folded into the batter. The nuts add a lovely crunch that contrasts perfectly with the fudgy texture.
Cream cheese variations: Beyond the classic swirl, try mixing cream cheese with different flavors – add lemon zest for brightness, or a touch of cinnamon for warmth.
Dietary Adaptations for Red Velvet Brownies
Gluten-free option: Replace the all-purpose flour with a 1:1 gluten-free flour blend. The texture will be slightly different but still delicious.
Dairy-free version: Substitute coconut oil for butter and use dairy-free cream cheese for the swirl. The coconut oil should be melted and cooled slightly, just like butter.
| Variation | Substitution | Notes |
|---|---|---|
| Gluten-Free Red Velvet Brownies | 1:1 GF flour blend | May need 2-3 extra minutes baking |
| Dairy-Free Red Velvet Brownies | Coconut oil + dairy-free cream cheese | Slightly different texture but great flavor |
| Sugar-Reduced Red Velvet Brownies | ¾ cup sugar instead of 1 cup | Less sweet, more intense chocolate flavor |
| Protein-Packed Red Velvet Brownies | Add 2 tbsp protein powder | Reduce flour by 2 tbsp, may need extra liquid |
Global Flavor Twists for Red Velvet Brownies
Mexican-inspired: Add a pinch of cinnamon and cayenne pepper to the batter for a spicy kick that complements the chocolate beautifully.
European elegance: Fold in chopped dark chocolate and a tablespoon of espresso powder for a more sophisticated flavor profile.
Serving Suggestions for Red Velvet Brownies
These red velvet brownies are stunning on their own, but here are some ways to elevate them:
Perfect Pairings for Red Velvet Brownies
Dessert presentations: Serve warm brownies with a scoop of vanilla ice cream and a drizzle of chocolate sauce. The temperature contrast and complementary flavors create a restaurant-quality dessert.
Coffee shop style: Cut into smaller squares and serve alongside your favorite coffee or tea. The rich, fudgy texture pairs beautifully with bold coffee flavors.
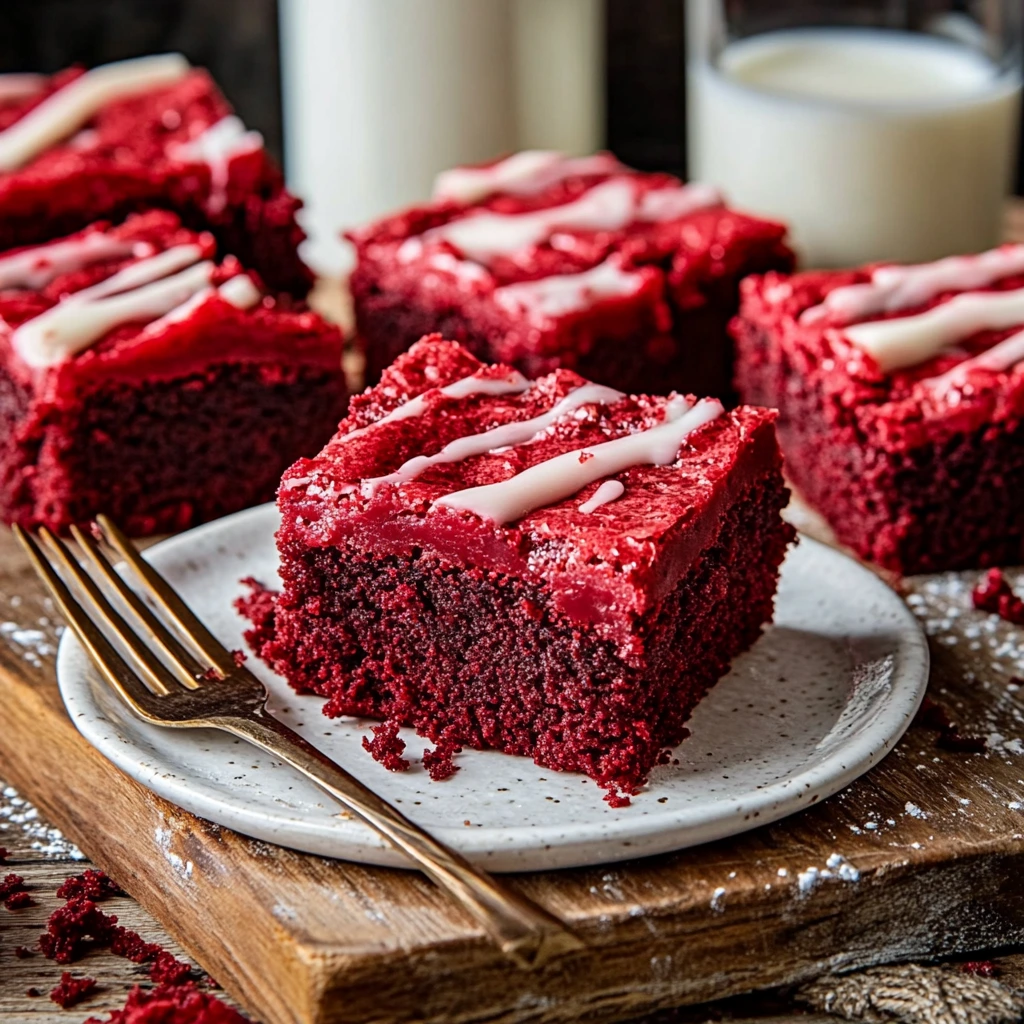
Party presentation: Dust with powdered sugar for an elegant finish, or drizzle with cream cheese glaze for extra indulgence.
Beverage Pairings for Red Velvet Brownies
Wine pairings: A glass of port or dessert wine complements the rich chocolate flavors beautifully. For something lighter, try a moscato or riesling.
Non-alcoholic options: Cold milk is classic, but try these red velvet brownies with hot chocolate for the ultimate comfort dessert, or with fresh coffee for a perfect afternoon treat.
FAQs About Red Velvet Brownies
Can I make Red Velvet Brownies ahead of time?
Absolutely! These red velvet brownies actually improve after sitting for a day. The flavors meld together, and the texture becomes even more fudgy. Store covered at room temperature for up to 3 days, or freeze for up to 3 months.
Why are my Red Velvet Brownies not red enough?
The most common cause is using too little food coloring or liquid food coloring instead of gel. Gel food coloring provides more vibrant color without thinning the batter. Start with 1 tablespoon and adjust to your preference.
Can I double this Red Velvet Brownies recipe?
Yes! Double all ingredients and use a 9×13-inch pan. The baking time will increase to 35-40 minutes. Test for doneness the same way – toothpick should come out with moist crumbs.
How do I fix overbaked Red Velvet Brownies?
If your brownies turn out dry, brush them with simple syrup (equal parts sugar and water, heated until sugar dissolves) while they’re still warm. This adds moisture back into the brownies.
Are Red Velvet Brownies safe during pregnancy?
Yes, this recipe is safe for pregnant women when all ingredients are fresh and the brownies are fully baked. The eggs are cooked through during baking, eliminating any safety concerns.
Can I make Red Velvet Brownies without food coloring?
While you can skip the food coloring, you’ll lose the characteristic red velvet appearance. The flavor will still be delicious – they’ll just look like regular chocolate brownies with a lighter color.
Conclusion
There’s something magical about pulling a pan of perfect red velvet brownies out of the oven – the deep red color, the fudgy texture, and that irresistible aroma that fills your kitchen. These brownies have become one of my most requested recipes at dishfoody.com, and I can see why. They’re approachable enough for beginning bakers but impressive enough to serve at special occasions.
Fire up your oven and try these red velvet brownies tonight! Whether you’re making them for a family dessert, bringing them to a potluck, or just treating yourself to something special, I promise they’ll deliver that perfect combination of comfort and elegance that makes red velvet so beloved.
Join the thousands of home bakers who’ve fallen in love with this recipe! I’d love to hear about your red velvet brownies adventures – share your photos and variations in the comments below. And if you loved these, don’t miss my Vanilla Bean Brown Butter Cheesecake and Coconut Cloud Cake Recipe – they’re perfect for expanding your dessert repertoire and creating even more sweet memories around your table.
Remember, cooking is about connection, creativity, and sharing something special with the people you love. These red velvet brownies are just one more way to bring a little extra joy to your kitchen and your table.