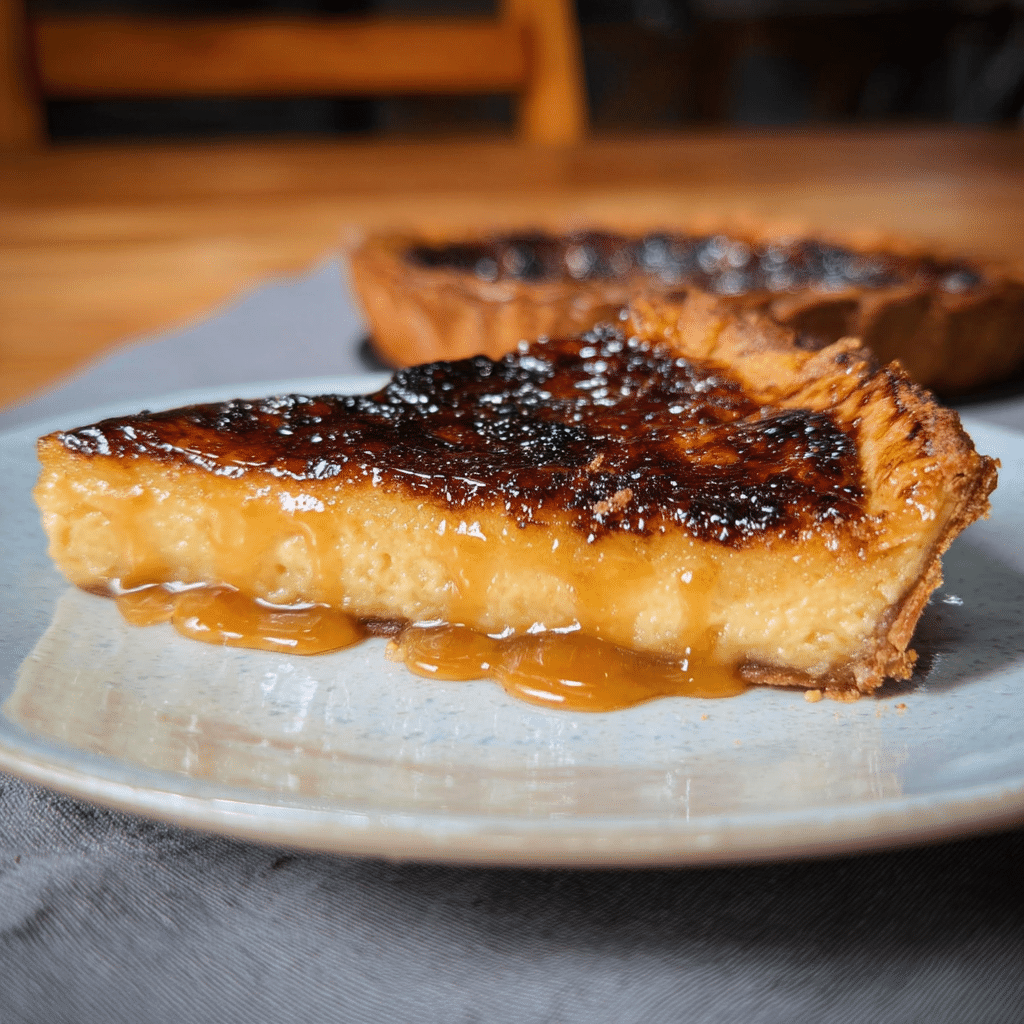
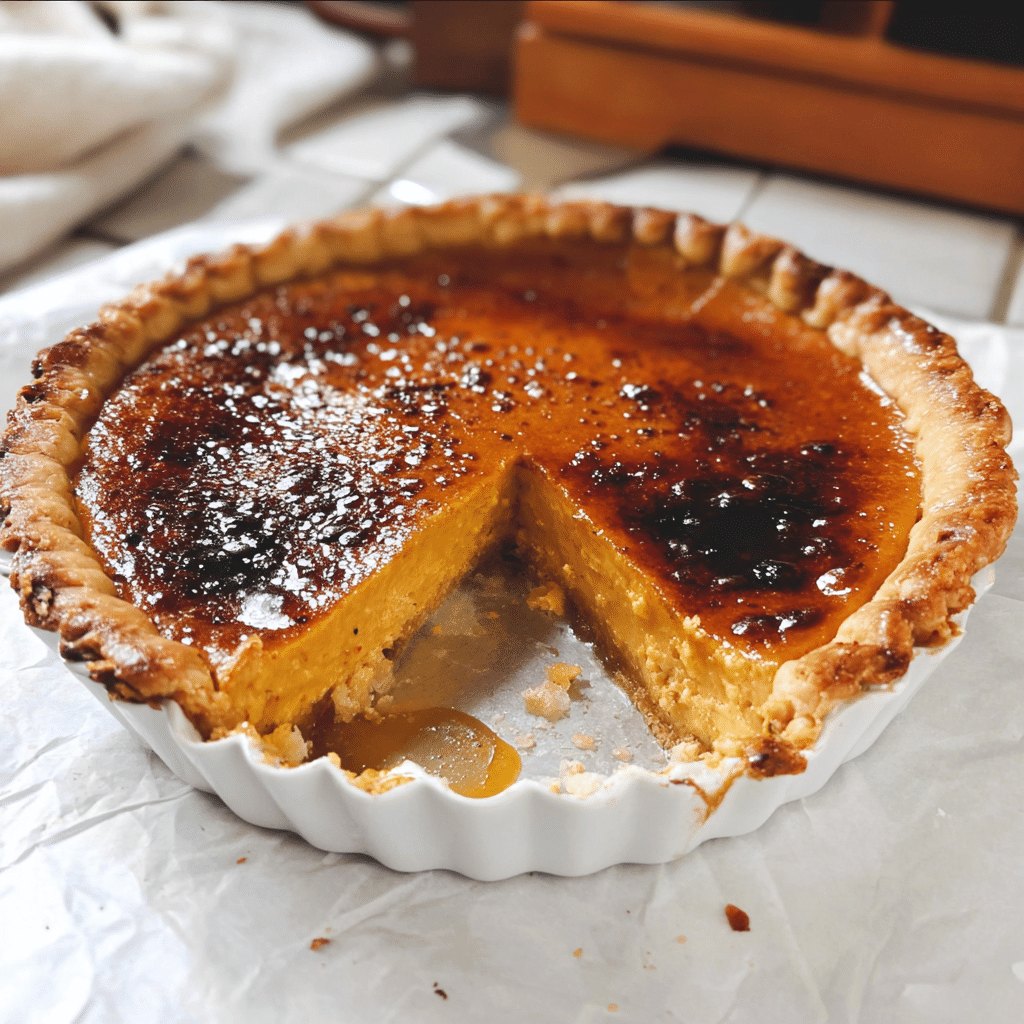
Tired of ordinary desserts that taste forgettable and leave your guests underwhelmed? Burnt Honey Pie elevates your dessert game with its sophisticated caramelized honey filling, silky custard texture, and buttery pastry crust that creates an unforgettable finale to any meal. This restaurant-quality dessert delivers complex, nuanced flavors with a dramatic presentation that will have everyone asking for the recipe.
Hi, I’m Sam from dishfoody.com, and this recipe represents one of my most cherished culinary discoveries. The inspiration came during a particularly memorable dinner party when I wanted to serve something truly special beyond the usual chocolate cake or fruit tart. After experimenting with burnt honey techniques I’d learned from pastry chefs, this pie emerged as the perfect balance of elegance and approachability.
What makes this Burnt Honey Pie extraordinary isn’t just its stunning flavor profile, but the fascinating technique of caramelizing honey to create deeper, more complex notes. In this comprehensive guide, you’ll master the art of burning honey without bitterness, creating the perfect custard consistency, and achieving a flaky crust that complements the rich filling. You’ll discover professional techniques, troubleshooting tips, and presentation secrets that transform this dessert into a showstopper.
Why This Burnt Honey Pie Recipe Works
The brilliance of this Burnt Honey Pie lies in its sophisticated technique that transforms simple honey into a complex, caramelized flavor base while maintaining the perfect balance between sweetness and depth.
• Caramelized honey creates unmatched complexity: Burning honey develops deep, toasted flavors with hints of molasses and butterscotch that regular honey simply cannot achieve • Silky custard filling provides luxurious texture: The perfect ratio of eggs and cream creates a filling that’s set but still trembles slightly when sliced • Buttery pastry crust complements without competing: A classic pie dough provides the ideal neutral backdrop that lets the burnt honey shine • Make-ahead friendly for stress-free entertaining: This pie actually improves in flavor after chilling overnight, making it perfect for special occasions • Impressive presentation with approachable technique: While it looks and tastes restaurant-quality, the methods are accessible to home bakers
Choosing the Right Honey for Burnt Honey Pie
The foundation of exceptional Burnt Honey Pie begins with selecting the perfect honey that will caramelize beautifully and provide the signature flavor this dessert is known for.
Best Types for This Burnt Honey Pie Recipe
Wildflower or clover honey provides the ideal balance of sweetness and complexity for burning. These varieties have enough character to develop interesting notes when caramelized but won’t overwhelm with overly distinctive flavors. Avoid delicate honeys like acacia, which can become bitter when burnt.
Local, unfiltered honey often has more complex flavor compounds that develop beautifully during the caramelization process. The slight variations in flavor from different floral sources add depth to the final pie.
Buying Tips for Burnt Honey Pie
Choose honey that flows smoothly and has a clear, golden color without crystallization. Crystallized honey can work but should be gently warmed to liquefy before using. Avoid honey that’s been heavily processed or contains artificial additives these don’t caramelize as predictably.
Substitutions for Burnt Honey Pie
While honey is irreplaceable for the signature flavor, you can experiment with different varieties to create unique profiles. Orange blossom honey adds subtle citrus notes, while buckwheat honey provides earthier, more robust flavors when burnt.
Ingredients & Prep for Burnt Honey Pie
Creating the perfect Burnt Honey Pie requires careful attention to ingredient quality and proper preparation techniques that ensure each component contributes to the final masterpiece.
Honey Preparation for Burnt Honey Pie
The key to this recipe lies in properly burning the honey to achieve deep caramelization without bitterness. Use ¾ cup high-quality honey and cook it in a heavy-bottomed saucepan over medium heat, stirring constantly until it turns deep amber and develops a slightly smoky aroma about 8-10 minutes. The honey should bubble vigorously and foam up during this process.
Custard Base Components for Burnt Honey Pie
The filling combines the burnt honey with a rich custard base:
• Heavy cream (1½ cups): Creates the luxurious, silky texture • Large eggs (4 whole): Provides structure and richness • Egg yolks (2 additional): Extra richness and deeper color • Vanilla extract (2 teaspoons): Enhances the honey’s complex flavors • Salt (¼ teaspoon): Balances sweetness and enhances all other flavors • Unsalted butter (3 tablespoons): Adds richness and helps smooth the filling
Pastry Foundation for Burnt Honey Pie
A classic butter pie crust provides the perfect foundation. Use 1¼ cups all-purpose flour, ½ cup cold unsalted butter cut into cubes, ¼ cup ice water, 1 tablespoon sugar, and ½ teaspoon salt. Keep all ingredients as cold as possible for the flakiest results.
Step-by-Step Cooking Instructions for Burnt Honey Pie
Mastering this Burnt Honey Pie requires understanding the critical timing and technique for each component. Success depends on proper sequence and attention to temperature.
Pre-Baking Prep for Burnt Honey Pie
Begin by making the pie crust and chilling it for at least 30 minutes. Roll out the dough and place it in a 9-inch pie pan, crimping the edges decoratively. Prick the bottom with a fork and line with parchment paper filled with pie weights. Pre-bake at 375°F for 15 minutes, remove weights and parchment, then bake 5 more minutes until lightly golden.
Honey Burning Method for Burnt Honey Pie
In a heavy-bottomed saucepan, cook ¾ cup honey over medium heat, stirring constantly with a wooden spoon. The honey will bubble, foam, and gradually darken to a deep amber color. This takes 8-10 minutes don’t rush this process. The honey is ready when it smells slightly smoky and has a rich, caramel-like appearance. Remove from heat immediately.
Custard Assembly for Burhttps://dishfoody.com/texas-chocolate-pecan-pie-recipe/nt Honey Pie
Gradually whisk the hot cream into the burnt honey be careful as it may bubble up vigorously. In a separate bowl, whisk together 4 whole eggs and 2 egg yolks until smooth. Slowly add the honey-cream mixture to the eggs, whisking constantly to prevent curdling. Stir in vanilla, salt, and butter until completely smooth.
Final Baking for Burnt Honey Pie
Strain the filling through a fine-mesh sieve to remove any lumps, then pour into the pre-baked crust. Bake at 325°F for 35-40 minutes, until the center is just set but still slightly jiggly. The filling should not puff up or crack if it does, the oven is too hot.
Pro Tips for Perfect Burnt Honey Pie
Achieving bakery-quality results with your Burnt Honey Pie requires mastering several professional techniques that ensure consistent, elegant results every time.
Avoiding Bitter Honey in Burnt Honey Pie
Watch the color carefully burnt honey should be deep amber, not dark brown or black. Stir constantly to prevent hot spots that can create bitter flavors. Remove from heat immediately when the proper color is reached the residual heat will continue cooking the honey briefly.
Temperature Control for Burnt Honey Pie
Use an instant-read thermometer to monitor the honey temperature it should reach 300°F for proper caramelization. Temper the eggs slowly by adding the hot honey mixture gradually while whisking to prevent scrambling. Check oven accuracy with an oven thermometer to ensure proper baking temperature.
Storage & Serving for Burnt Honey Pie
Store the finished Burnt Honey Pie covered in the refrigerator for up to 3 days. The flavors actually improve after 24 hours as they meld and develop. Serve at room temperature for best flavor and texture remove from refrigerator 30 minutes before serving.
Flavor Variations for Burnt Honey Pie
The elegant simplicity of Burnt Honey Pie provides an excellent foundation for sophisticated variations that add complexity while maintaining the signature burnt honey character.
Lavender Burnt Honey Pie
Add 1 teaspoon dried culinary lavender to the cream before heating, then strain it out before combining with eggs. The floral notes complement the caramelized honey beautifully without overwhelming the delicate flavor balance.
Cardamom Burnt Honey Pie
Toast 6 cardamom pods lightly, crush them, and steep in the hot cream for 10 minutes before straining. The warm spice adds exotic complexity that enhances rather than masks the burnt honey flavor.
Salted Burnt Honey Pie
Sprinkle flaky sea salt over the finished pie just before serving. The salt crystals provide textural contrast and enhance the caramelized honey flavors through the classic sweet-salty combination.
| Variation | Key Addition | Flavor Profile | Best Occasion |
|---|---|---|---|
| Classic | Standard recipe | Pure burnt honey | Elegant dinners |
| Lavender | Dried lavender | Floral and sophisticated | Garden parties |
| Cardamom | Ground cardamom | Warm and exotic | Holiday meals |
| Salted | Sea salt flakes | Sweet-salty contrast | Contemporary dining |
Serving Suggestions for Burnt Honey Pie
This sophisticated Burnt Honey Pie deserves presentation that matches its elegant flavors and luxurious texture, making it the perfect finale for special occasions.
Fine dining presentation: Serve thin slices on chilled dessert plates with a dollop of unsweetened whipped cream and a drizzle of additional burnt honey. Garnish with edible flowers or gold leaf for truly special occasions.
Casual elegance: Accompany with vanilla ice cream that melts slightly into the warm pie, creating a beautiful contrast of temperatures and textures. Fresh berries add color and acidity that balances the rich sweetness.
Coffee service pairing: This pie pairs exceptionally well with strong coffee or espresso. The bitter notes in coffee complement the caramelized honey perfectly, making it ideal for afternoon tea service or after-dinner coffee.
FAQs About Burnt Honey Pie
Can I make Burnt Honey Pie without burning the honey?
While you can make a honey custard pie without burning the honey, you’ll miss the signature deep, complex flavors that make this dessert special. The caramelization process is what creates the unique taste profile that sets this pie apart from ordinary honey desserts.
How do I know when my Burnt Honey Pie is properly set?
The pie is done when the center is just set but still slightly jiggly when gently shaken. It should not puff up or crack during baking. The filling will continue to set as it cools, so don’t overbake or you’ll end up with a rubbery texture.
Is Burnt Honey Pie safe for pregnant women?
This recipe contains raw eggs in the custard filling that are thoroughly cooked during baking, making it safe for pregnant women. Ensure the internal temperature reaches 160°F for complete food safety, and use pasteurized eggs if you have any concerns.
Can I freeze Burnt Honey Pie for later use?
While technically possible, freezing isn’t recommended as it can affect the delicate custard texture. The pie keeps well in the refrigerator for 3 days and actually improves in flavor, making advance preparation easy without freezing.
What’s the best way to prevent cracks in my Burnt Honey Pie?
Prevent cracking by baking at the correct temperature (325°F), not overbaking, and avoiding temperature shocks. Don’t open the oven door frequently during baking, and let the pie cool gradually at room temperature before refrigerating.
Conclusion
Ready to create a dessert that will leave your guests speechless? This Burnt Honey Pie transforms simple ingredients into an extraordinary finale that rivals the finest restaurant desserts. The sophisticated technique of caramelizing honey creates depth and complexity that elevates this pie from ordinary to unforgettable.
Join the ranks of home bakers who’ve discovered the magic of burnt honey! This recipe proves that with the right technique and quality ingredients, you can create professional-level desserts in your own kitchen that will be remembered long after the last bite.
Ready to explore more elegant dessert options? Try our Lemon Cream Cheese Bars Recipe or Texas Chocolate Pecan Pie for more impressive finales that showcase your culinary skills!
PrintBurnt Honey Pie: The Most Luxurious Dessert You’ll Ever Make

A rich and caramelized custard pie made with deeply cooked honey, balanced with cream and butter for a silky smooth filling in a flaky pie crust.
- Prep Time: 15 mins
- Cook Time: 40 mins
- Total Time: 55 mins
- Yield: 1 pie (8 slices) 1x
- Category: Dessert
- Method: Baked
- Cuisine: American
- Diet: Vegetarian
Ingredients
- 1 9-inch pie crust, pre-baked
- 1/2 cup honey
- 1/4 cup sugar
- 1/2 cup unsalted butter, melted
- 3 large eggs
- 1/2 cup heavy cream
- 1 tsp vanilla extract
- 1/2 tsp salt
Instructions
- 1. Preheat oven to 350°F (175°C).
- 2. In a saucepan over medium heat, cook honey until it darkens slightly and smells caramelized, about 3–5 minutes.
- 3. Remove from heat and whisk in sugar and melted butter until smooth.
- 4. In a separate bowl, whisk together eggs, cream, vanilla, and salt.
- 5. Slowly whisk honey mixture into egg mixture to temper.
- 6. Pour filling into pre-baked crust.
- 7. Bake for 35–40 minutes, until center is just set.
- 8. Cool completely before slicing.
- 9. Serve with whipped cream if desired.
Notes
- Watch honey closely while cooking—it burns quickly but that’s where the flavor comes from.
- Pie can be made a day ahead and stored chilled.
- Best served slightly warm or at room temperature.
Nutrition
- Serving Size: 1 slice
- Calories: 320
- Sugar: 28g
- Sodium: 160mg
- Fat: 18g
- Saturated Fat: 10g
- Unsaturated Fat: 7g
- Trans Fat: 0g
- Carbohydrates: 36g
- Fiber: 0g
- Protein: 4g
- Cholesterol: 95mg
Keywords: Burnt Honey Pie, caramelized honey pie, custard pie