
Grilled cheese roll-ups are about to become your new favorite comfort food obsession! I’m Sam from dishfoody.com, and I discovered this genius recipe during one of those hectic weeknight moments when my kids were demanding “something fun” for dinner. As someone who’s always looking for creative ways to transform classic comfort foods, I knew I had to share this incredible twist on the traditional grilled cheese sandwich.
Picture this: all the gooey, melty goodness of a grilled cheese sandwich, but rolled up into perfectly crispy, golden bites that are impossible to resist. These grilled cheese roll-ups deliver that nostalgic comfort food experience while being incredibly versatile—perfect for lunch boxes, after-school snacks, party appetizers, or even a quick dinner solution.
Having spent years perfecting comfort food recipes that bring families together, I can confidently say this technique transforms ordinary ingredients into something truly special. You’ll learn my secrets for achieving the perfect crispy exterior, preventing cheese leakage, and creating variations that will keep everyone coming back for more.
In this guide, we’ll cover everything from selecting the best bread and cheese combinations to mastering the rolling technique, plus I’ll share pro tips for meal prep and creative serving ideas that will elevate your grilled cheese roll-ups game.
Why This Grilled Cheese Roll-Ups Recipe Works
This grilled cheese roll-ups recipe has become a dishfoody.com favorite because it solves so many common kitchen challenges while delivering maximum flavor and fun. Here’s why this recipe consistently delivers perfect results:
• Uses everyday pantry staples – No need for specialty ingredients or expensive cheeses; basic sandwich bread and your favorite cheese create magic • Ready in under 15 minutes – From start to finish, these roll-ups come together faster than traditional grilled cheese sandwiches • Perfect portion control – Each roll-up is a single, satisfying serving that’s ideal for kids and adults alike • Foolproof technique – The rolling method prevents cheese from oozing out and creates an even, crispy exterior every time • Incredibly versatile base – Add proteins, vegetables, or different seasonings to create endless flavor combinations • Make-ahead friendly – Prepare these in advance for busy weeknights or pack them for lunch boxes and picnics
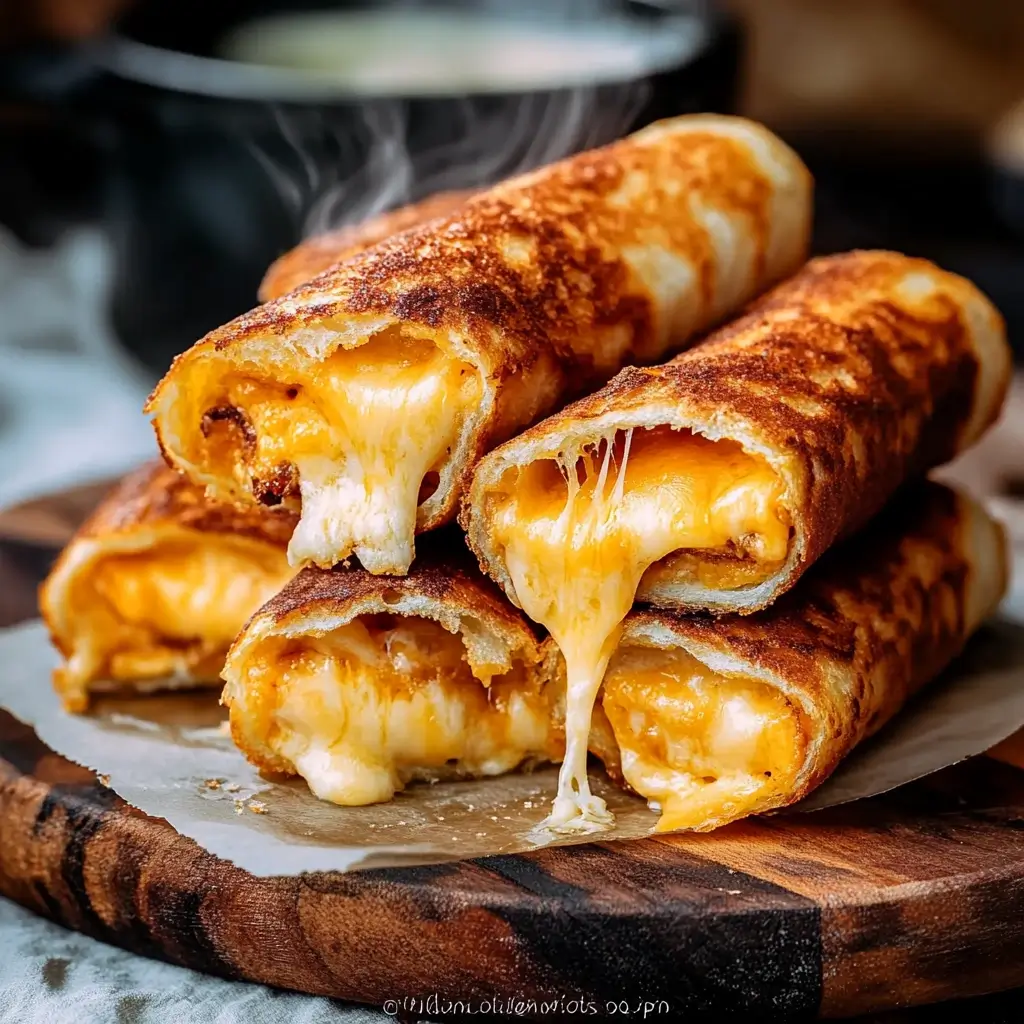
The secret lies in flattening the bread, which creates a flexible base that rolls tightly without cracking. This technique, combined with proper butter application, ensures every grilled cheese roll-up achieves that perfect golden-brown crispiness that makes them irresistible.
Choosing the Right Ingredients for Grilled Cheese Roll-Ups
Selecting quality ingredients is crucial for creating the best grilled cheese roll-ups. Each component plays a specific role in achieving the perfect texture and flavor balance.
Best Bread Types for This Grilled Cheese Roll-Ups Recipe
White sandwich bread remains the classic choice because its soft texture flattens easily and creates seamless rolls. The mild flavor allows the cheese to shine while providing the perfect crispy exterior when grilled. Whole wheat bread offers a nuttier flavor and slightly more complex texture, though it requires gentler handling during the flattening process.
Avoid artisanal breads with large air pockets or very dense grain breads, as these won’t flatten properly and may crack when rolled. Day-old bread actually works better than fresh bread because it’s slightly less moist and holds its shape better during rolling.
Cheese Selection Tips
Cheddar cheese provides sharp, tangy flavor that pairs beautifully with the buttery bread exterior. American cheese melts incredibly smoothly and creates that classic comfort food taste most people crave. Mozzarella offers mild flavor with exceptional melting properties, creating those Instagram-worthy cheese pulls.
For best results, use pre-sliced cheese rather than shredded varieties. Sliced cheese maintains its shape better during rolling and prevents the filling from falling out. Avoid aged or hard cheeses like Parmesan, as they don’t melt smoothly enough for this technique.
Butter and Enhancement Options
Softened butter spreads more evenly than melted butter, creating consistent browning across the entire surface. However, melted butter works well if you’re preparing multiple batches and need efficiency.
Consider herb-infused butter for extra flavor—mix softened butter with garlic powder, dried herbs, or grated Parmesan before applying to the roll-ups.
Ingredients & Prep for Perfect Grilled Cheese Roll-Ups
Proper preparation is the foundation of successful grilled cheese roll-ups. Taking time to prep ingredients correctly ensures smooth assembly and consistent results.
Essential Prep Steps for Grilled Cheese Roll-Ups
Start by trimming crusts from all bread slices using a sharp knife. Crusts prevent even flattening and can cause the bread to tear during rolling. Save the crusts for breadcrumbs or compost—don’t let them go to waste.
Flatten each bread slice using a rolling pin, applying gentle, even pressure from center to edges. The bread should become pliable and slightly compressed without tearing. If you don’t have a rolling pin, use a clean glass or your hands to gently press and stretch the bread.
Allow cheese slices to come to room temperature for about 10 minutes before assembly. Room-temperature cheese is more pliable and less likely to break the bread when you’re rolling.
Assembly Tips for Grilled Cheese Roll-Ups
Place cheese slices evenly on flattened bread, leaving a small border around edges to prevent spillage. If using additional fillings like ham or herbs, layer them thinly to maintain the roll’s structural integrity.
Roll each grilled cheese roll-up tightly from one end to the other, applying gentle pressure to ensure the roll stays compact. The seam should seal naturally against the bread’s surface—avoid pressing too hard, which can squeeze out the filling.
Make-Ahead Preparation
These grilled cheese roll-ups can be assembled up to 2 hours in advance and stored covered in the refrigerator. This actually helps them hold their shape better during cooking. Don’t apply butter until just before cooking to prevent sogginess.
Step-by-Step Cooking Instructions for Grilled Cheese Roll-Ups
Mastering the cooking technique is essential for achieving perfectly crispy, golden grilled cheese roll-ups with melted centers every time.
Pre-Cooking Prep for Grilled Cheese Roll-Ups
Heat your nonstick skillet over medium heat—this temperature is crucial for even browning without burning. While the pan heats, brush or spread softened butter evenly over the entire surface of each roll-up. Don’t skip any spots, as unbuttered areas won’t brown properly.
Ensure your grilled cheese roll-ups are at room temperature before cooking. Cold roll-ups will cook unevenly, with the exterior browning before the cheese melts completely.
Cooking Method for Grilled Cheese Roll-Ups
Place roll-ups seam-side down in the heated skillet, leaving space between each one to prevent overcrowding. Cook for 2-3 minutes without moving them—this allows proper crust formation. You’ll hear gentle sizzling, which indicates proper browning is occurring.
Using tongs or a spatula, carefully rotate each grilled cheese roll-up to brown all sides evenly. Continue cooking for 1-2 minutes per side until the entire surface is golden brown and crispy. The total cooking time should be 6-8 minutes.
Doneness Check for Grilled Cheese Roll-Ups
Perfect grilled cheese roll-ups will be uniformly golden brown with slightly firm exteriors. Gently press the center of a roll-up—it should feel warm and slightly soft, indicating the cheese has melted completely. If the exterior browns too quickly before the cheese melts, reduce heat and cover the pan briefly.
Resting for Grilled Cheese Roll-Ups
Allow cooked grilled cheese roll-ups to rest on a wire rack or paper towels for 1-2 minutes before serving. This brief resting period prevents the molten cheese from burning your mouth while maintaining the crispy exterior texture.
Pro Tips for Perfect Grilled Cheese Roll-Ups
These expert techniques will elevate your grilled cheese roll-ups from good to absolutely incredible, ensuring consistent results every time you make them.
Avoiding Common Mistakes with Grilled Cheese Roll-Ups
Never overcrowd your skillet when cooking grilled cheese roll-ups. Overcrowding reduces heat circulation and creates steam, which prevents proper crisping. Cook in batches if necessary, keeping finished roll-ups warm in a 200°F oven.
Avoid using too much filling, which causes roll-ups to burst open during cooking. A single slice of cheese per roll-up is typically perfect—more can make rolling difficult and messy.
Don’t rush the cooking process by using high heat. Medium heat allows the cheese to melt completely while the exterior develops that perfect golden crust. High heat burns the outside before the inside is properly heated.
Essential Tool Recommendations for Grilled Cheese Roll-Ups
A nonstick skillet is absolutely essential for grilled cheese roll-ups success. The nonstick surface prevents sticking and allows for easy turning without damaging the delicate roll structure.
Invest in a good rolling pin for consistent bread flattening. While you can use alternatives like glasses or cans, a proper rolling pin creates more even results and is easier to control.
Silicone-tipped tongs are ideal for turning roll-ups without puncturing the surface. Avoid metal utensils that might tear the delicate exterior.
Storage and Reheating for Grilled Cheese Roll-Ups
Cooked grilled cheese roll-ups can be stored in the refrigerator for up to 3 days. Reheat them in a 350°F oven for 5-7 minutes to restore crispiness—avoid microwaving, which makes them soggy.
For longer storage, freeze cooled roll-ups in a single layer on a baking sheet, then transfer to freezer bags. They’ll keep for up to 2 months and can be reheated directly from frozen in a 375°F oven for 10-12 minutes.
Flavor Variations for Grilled Cheese Roll-Ups
Transform your basic grilled cheese roll-ups into exciting flavor adventures with these creative variations that cater to different tastes and dietary preferences.
Savory Protein Additions to Grilled Cheese Roll-Ups
Ham and cheese grilled cheese roll-ups create a classic combination—add thin slices of deli ham along with the cheese for a heartier option. Turkey and Swiss creates a more sophisticated flavor profile, while bacon bits (pre-cooked) add smoky richness without excess grease.
For a breakfast twist, add scrambled eggs (cooled) to your grilled cheese roll-ups along with breakfast sausage crumbles. This creates a portable breakfast option that’s perfect for busy mornings.
Spicy Variations of Grilled Cheese Roll-Ups
Create jalapeño popper grilled cheese roll-ups by adding thin jalapeño slices and a small amount of cream cheese along with your regular cheese. The cream cheese helps balance the heat while adding richness.
Buffalo chicken grilled cheese roll-ups combine shredded cooked chicken tossed in buffalo sauce with mozzarella cheese. Serve with ranch or blue cheese dipping sauce for the complete experience.
International Flavors for Grilled Cheese Roll-Ups
Italian-inspired grilled cheese roll-ups feature mozzarella cheese with thin basil leaves and a small amount of marinara sauce. Be careful not to add too much sauce, which can make rolling difficult.
Mexican-style versions combine pepper jack cheese with thin avocado slices and a sprinkle of cumin. Serve with salsa or guacamole for dipping.
Flavor Variations Comparison Table
| Variation | Main Ingredients | Best Cheese | Serving Suggestion |
|---|---|---|---|
| Classic | Bread + butter | Cheddar or American | Tomato soup for dipping |
| Ham & Cheese | + Deli ham | Swiss or Cheddar | Honey mustard dip |
| Jalapeño Popper | + Jalapeños + cream cheese | Mozzarella | Ranch dressing |
| Buffalo Chicken | + Buffalo chicken | Mozzarella | Blue cheese sauce |
| Italian | + Basil + marinara | Mozzarella | Extra marinara for dipping |
| Mexican | + Avocado + cumin | Pepper Jack | Salsa or guacamole |
| Breakfast | + Scrambled eggs + sausage | Cheddar | Maple syrup |
| Apple Cinnamon | + Apple slices + cinnamon | Mild Cheddar | Caramel sauce |
Serving Suggestions for Grilled Cheese Roll-Ups
Elevate your grilled cheese roll-ups experience with thoughtful pairings and creative presentation ideas that transform this simple recipe into a memorable meal.
Perfect Soup Pairings with Grilled Cheese Roll-Ups
Classic tomato soup remains the gold standard for grilled cheese roll-ups dipping. The acidity cuts through the rich, buttery exterior while complementing the melted cheese perfectly. Warm the soup to just below boiling and serve in small bowls for individual dipping.
Butternut squash soup offers a sweeter, more sophisticated pairing that works especially well with whole wheat grilled cheese roll-ups. The natural sweetness balances savory cheese flavors while providing a beautiful color contrast.
Creamy mushroom soup creates an earthy, umami-rich combination that’s particularly good with Swiss cheese variations. The cream base echoes the richness of the melted cheese while adding depth of flavor.
Side Dish Combinations for Grilled Cheese Roll-Ups
Fresh fruit salad provides a bright, acidic contrast to rich grilled cheese roll-ups. Apple slices, grapes, and berries work particularly well, offering natural sweetness and refreshing palate cleansers.
Simple green salads with light vinaigrette help balance the indulgent nature of grilled cheese roll-ups. The fresh vegetables and acidic dressing cut through the richness while adding nutritional value.
Crispy pickle spears or chips offer tangy crunch that complements the soft, melty texture of the roll-ups. The acidity and salt enhance the cheese flavors while providing textural contrast.
Beverage Pairings for Grilled Cheese Roll-Ups
Cold milk remains the classic beverage choice, especially for kids. The coolness and mild flavor balance the warm, rich grilled cheese roll-ups perfectly.
For adults, light beers like wheat ales or pilsners provide refreshing contrast without overwhelming the delicate cheese flavors. The carbonation helps cleanse the palate between bites.
Iced tea or lemonade offers sweet-tart refreshment that works well with any variation of grilled cheese roll-ups. The acidity helps cut through rich flavors while providing cooling relief.
FAQs About Grilled Cheese Roll-Ups
Can I make grilled cheese roll-ups ahead of time?
Yes! You can assemble grilled cheese roll-ups up to 2 hours in advance and store them covered in the refrigerator. Don’t apply butter until just before cooking to prevent sogginess. For longer storage, freeze assembled (uncooked) roll-ups for up to 1 month—cook directly from frozen, adding 2-3 extra minutes to the cooking time.
What’s the best way to prevent cheese from leaking out of grilled cheese roll-ups?
Use room-temperature cheese slices and avoid overfilling. Leave a small border around the edges when placing cheese on the flattened bread. Roll tightly but gently, and always place seam-side down in the skillet first. This allows the seam to seal naturally from the heat.
Can I use gluten-free bread for grilled cheese roll-ups?
Absolutely! Gluten-free sandwich bread works well for grilled cheese roll-ups, though it may be more delicate during flattening. Use gentle pressure and work slowly. Some gluten-free breads benefit from a light misting of water before flattening to increase pliability.
How do I fix grilled cheese roll-ups that won’t stay rolled?
If your grilled cheese roll-ups keep unrolling, the bread may not be flattened enough, or you might be using too much filling. Re-flatten the bread more thoroughly and reduce filling quantity. You can also secure problematic roll-ups with toothpicks before cooking—just remember to remove them before serving.
Are grilled cheese roll-ups safe for young children?
Grilled cheese roll-ups are generally safe for children over 2 years old who can handle solid foods. Always test the temperature before serving, as melted cheese retains heat longer than you might expect. For very young children, allow roll-ups to cool completely and consider cutting them into smaller pieces to prevent choking.
Can I bake grilled cheese roll-ups instead of pan-frying?
While pan-frying produces the best texture, you can bake grilled cheese roll-ups at 400°F for 10-12 minutes, turning once halfway through. Brush with melted butter before baking and place on a wire rack over a baking sheet for better air circulation. The texture will be slightly different but still delicious.
Conclusion
These grilled cheese roll-ups have become one of my most requested recipes at dishfoody.com, and I can see why—they transform a simple comfort food into something special that brings smiles to faces of all ages. Whether you’re packing lunch boxes, hosting a casual gathering, or just want to add some fun to a regular Tuesday night dinner, these crispy, cheesy delights deliver every time.
The beauty of this recipe lies in its simplicity and endless adaptability. Start with the basic version to master the technique, then experiment with the flavor variations I’ve shared. From spicy jalapeño poppers to Italian-inspired versions, there’s a combination for every taste preference and dietary need.
Ready to create some kitchen magic? Gather your ingredients and give these grilled cheese roll-ups a try tonight! I’d love to see your creations—share photos of your roll-ups on social media and tag dishfoody.com. Join the thousands of home cooks who’ve already discovered why these have become such a beloved recipe.
Looking for more comfort food transformations? Check out my Killer Maple Mustard Croissant Breakfast Sandwiches and Twice Baked Loaded Breakfast Potatoes for more dishes that bring families together around the dinner table. Because at dishfoody.com, we believe the best recipes are the ones that create lasting memories, one delicious bite at a time.