Valentine Floam Slime Recipe isn’t just another craft project it’s a sensory experience that brings together texture, color, and pure fun, especially perfect for celebrating love and creativity. Hi, I’m Sam from dishfoody.com, and while I typically share recipes that bring people together around the dinner table, I’ve always believed that creating something with your hands whether it’s a dish or a craft builds connections and memories.
This Valentine’s season, I wanted to share something special that families, friends, and couples can make together: a perfectly textured, satisfyingly crunchy floam slime in beautiful Valentine colors. If you’ve ever been frustrated by slime that’s too sticky, too stiff, or just doesn’t have that signature floam crunch, this recipe will solve all those problems.
I’ve tested this formula multiple times to ensure you get that ideal stretchy-yet-crunchy texture every single time. In this guide, I’ll walk you through everything from choosing the right foam beads to troubleshooting common issues, plus fun variations to customize your love slime.
Why This Valentine Floam Slime Recipe Works
Creating the perfect Valentine Floam Slime Recipe comes down to three key factors: texture, visual appeal, and foolproof success. Unlike regular slime recipes that can be unpredictable, this version uses precise measurements and quality ingredients that work together beautifully. Here’s why this recipe stands out:
• Uses easy-to-find craft supplies available at any craft store or online
• Creates the perfect balance between stretchy slime base and crunchy floam texture in just 20 minutes
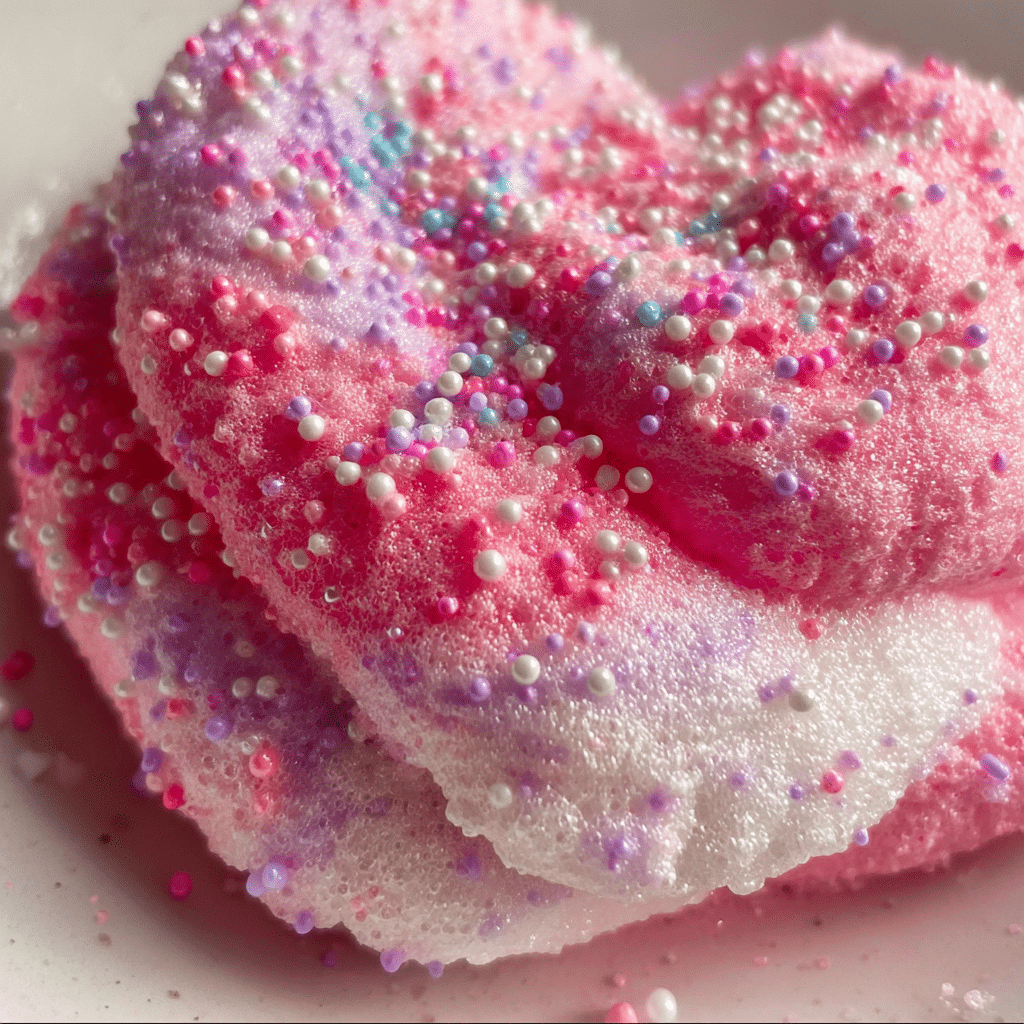
• Produces vibrant Valentine colors (pink, red, and white) that stay bright and don’t fade
• Works beautifully for both beginners and experienced slime makers
• Makes enough slime for sharing or creating multiple batches in different color combinations
• Stores well for weeks when properly sealed, so you can make it ahead of Valentine’s Day
The secret is in the foam-to-slime ratio and the activation process. Too many foam beads and your slime becomes crumbly; too few and you lose that satisfying crunch. This recipe hits the sweet spot every time, giving you that ASMR-worthy texture that makes floam slime so addictive to play with.
Choosing the Right Materials for Valentine Floam Slime Recipe
The quality of your materials directly impacts your final product. Let me break down exactly what you need and why each component matters.
Best Foam Beads for This Recipe
Polystyrene foam beads are the heart of any floam slime. For the Valentine Floam Slime Recipe, I recommend small-sized beads (2-4mm diameter) rather than large ones. Small beads distribute more evenly throughout your slime, creating a consistent texture without large gaps. Look for white foam beads, which you can leave white or tint with your slime colors. Craft stores typically carry these in the floral or kids’ craft section. Online retailers often sell them in bulk, which is economical if you’re making multiple batches. Avoid using packing peanuts or bean bag filling these are too large and won’t give you the right texture.
Buying Tips for Slime Base Ingredients
Your slime base needs three critical components: clear or white school glue (PVA glue), slime activator, and optional add-ins. For glue, brands like Elmer’s work perfectly because they have consistent formulation. Avoid craft glues or super glues. For activators, you have options: contact lens solution with boric acid, liquid starch, or borax solution. I prefer contact lens solution because it’s widely available and easy to control. When shopping, read labels carefully your contact solution must contain boric acid or sodium borate to work as an activator. For Valentine colors, gel food coloring works better than liquid because it doesn’t water down your slime. Choose bright pink, red, and keep some white uncolored for contrast.
Substitutions for Valentine Floam Slime Recipe
If you can’t find specific materials, here are effective substitutions. White school glue can replace clear glue (your slime will be opaque instead of translucent). Liquid starch can substitute for contact solution at a 2:1 ratio. If foam beads aren’t available, you can use small craft pom-poms or even finely cut sponge pieces for texture, though this technically becomes “crunchy slime” rather than true floam. For coloring, acrylic paint works but use sparingly as too much affects slime consistency. In a pinch, crushed conversation hearts (candy) can add both texture and a subtle Valentine theme, though this version won’t last as long.
Ingredients & Prep for Valentine Floam Slime Recipe
Gathering everything before you start makes the process smooth and enjoyable. Here’s your complete shopping list and prep guide.
Essential Materials for Valentine Floam Slime Recipe
For the slime base:
• 8 oz white school glue (one standard bottle)
• 1/2 cup warm water for mixing
• 3-4 tablespoons contact lens solution containing boric acid
• 1/2 teaspoon baking soda
• Gel food coloring in pink, red, and optional purple
• 1-2 cups small polystyrene foam beads
For prep and storage:
• Large mixing bowls (at least 2)
• Measuring cups and spoons
• Mixing spoon or craft stick
• Airtight containers for storage
• Optional: glitter, heart-shaped confetti, or Valentine stickers for decoration
Mixing Strategy and Color Planning
Before you begin mixing, decide on your color scheme. You can make three separate batches (pink, red, white) and swirl them together, or create one large batch and divide it. For a marbled effect, make your base slime white, then add drops of color and gently fold rather than fully mixing. The foam beads can be added to colored slime or kept separate and added at the end. I recommend adding beads after your slime is fully activated for better control over texture. If making this with children, prep your colors in advance and have each person customize their own portion.
Storage Preparation
Valentine Floam Slime Recipe can last 2-4 weeks with proper storage. Before you even start mixing, have your storage containers ready. Small mason jars, plastic containers with tight lids, or even ziplock bags work well. Label them with the date and color if making multiple batches. Store finished slime at room temperature away from direct sunlight. If your slime starts getting sticky after storage, reactivate it with a few drops of contact solution and kneading. If it gets too stiff, add a tiny amount of lotion or hand soap to restore stretchiness.
Step-by-Step Cooking Instructions for Valentine Floam Slime Recipe
Now let’s create your perfect Valentine Floam Slime Recipe with clear, foolproof steps.
Pre-Mixing Prep for Valentine Floam Slime Recipe
Start by setting up your workspace with newspaper, a plastic tablecloth, or silicone mat to protect surfaces. Empty your bottle of white glue into a large mixing bowl. Add 1/2 cup warm water to the glue and stir gently until completely combined this thins the glue slightly and makes it easier to activate. Add your baking soda (1/2 teaspoon) and stir well. The baking soda helps with slime texture and works with the contact solution to create proper activation. If you’re adding color, do it now by adding 3-5 drops of gel food coloring and mixing until you achieve your desired shade. For Valentine’s Day, I love making one batch bright pink and another deep red, then swirling them together.
Activation Method for Valentine Floam Slime Recipe
This is the most critical step. Add one tablespoon of contact lens solution to your glue mixture and stir vigorously. You’ll notice the mixture starting to pull away from the sides of the bowl and clump together. Continue stirring, then add another tablespoon of solution. At this point, start kneading with your hands. The slime will be very sticky at first this is normal. Keep kneading and add contact solution one teaspoon at a time until the slime no longer sticks to your hands. This typically takes 3-4 tablespoons total, but humidity affects this, so add gradually. The perfect consistency feels smooth, stretchy, and slightly bouncy when you press it. If your slime stays sticky after several minutes of kneading, add more activator. If it becomes stiff or rubbery, you’ve over-activated add a small amount of lotion to restore stretchiness.
Adding Foam Beads for Valentine Floam Slime Recipe
Once your base slime is perfectly activated, it’s time to create the floam texture. Place your slime on a clean surface and flatten it into a disc about half an inch thick. Pour approximately 1 cup of foam beads onto the center of the disc. Fold the slime over the beads and begin kneading to distribute them throughout. This takes patience keep folding and kneading until beads are evenly distributed. You’ll hear that satisfying crunchy sound as you work. If you want more crunch, add another 1/4 to 1/2 cup of beads. The ratio is personal preference more beads create intense crunch but less stretchiness, while fewer beads keep the slime stretchy with occasional crunch. For Valentine Floam Slime Recipe, I prefer a 1:1 ratio of slime volume to foam beads, which gives that perfect balance.
Finishing Touches for Valentine Floam Slime Recipe
For extra Valentine flair, consider adding heart-shaped confetti, edible heart sprinkles (if children won’t eat them), or fine glitter. Add these the same way you added foam beads place on flattened slime and knead to distribute. If making swirled colors, create two or three batches of different colored slime, each with foam beads mixed in. Then gently twist the colors together without fully blending. This creates beautiful marbled Valentine patterns. Store your finished Valentine Floam Slime Recipe in an airtight container immediately after play to prevent drying.
Pro Tips for Perfect Valentine Floam Slime Recipe
After making dozens of batches, I’ve learned these tricks for guaranteed success with your Valentine Floam Slime Recipe.
Avoiding Sticky or Stiff Slime Issues
The most common problem is under or over-activation. Sticky slime needs more activator add one teaspoon at a time and knead for at least 30 seconds between additions. Temperature matters too; cold slime is stiffer, so let it come to room temperature before playing. If your slime is too stiff or rubbery, you’ve added too much activator. Fix this by kneading in a small amount of unscented hand lotion (about a pea-sized amount) or a few drops of baby oil. Another trick is adding a tiny bit more glue and re-mixing. For Valentine Floam Slime Recipe specifically, foam beads can make slime feel drier than regular slime, which is normal the beads absorb some moisture. If this bothers you, store your floam slime with a slightly damp paper towel in the container (not touching the slime) to maintain humidity.
Essential Tools for Valentine Floam Slime Recipe Success
While you can make slime with just your hands and a bowl, a few tools make the process easier. Silicone mixing bowls are ideal because slime doesn’t stick to them. A silicone spatula helps scrape every bit from your bowl. For measuring activator precisely, use a small measuring spoon set—eyeballing often leads to over-activation. If making slime frequently, consider a digital scale to weigh glue and foam beads for perfect consistency every time. For Valentine Floam Slime Recipe, having separate containers for each color helps with organization. Heart-shaped cookie cutters are fun for pressing designs into your finished slime, and storage containers with dividers let you keep multiple colors separate but in one container.
Storage and Maintenance of Valentine Floam Slime Recipe
Proper storage extends your slime’s life significantly. Always store in an airtight container immediately after use exposure to air dries slime out within hours. If your slime develops a thin skin or crusty layer, knead it back in with a few drops of warm water. Your Valentine Floam Slime Recipe should last 2-4 weeks with proper care. If it develops an odor or visible mold, discard it immediately. To refresh slime that’s been stored for a week or more, take it out and knead it for a few minutes to redistribute the activator and restore texture. Foam beads may compress over time, making the slime less crunchy add fresh beads if desired. For gifting your Valentine Floam Slime Recipe, package in clear containers so recipients can see the beautiful colors, and include care instructions.
Looking for more creative Valentine’s treats? Check out my collection of festive ideas on Pinterest at DishfoodyMagic where I share seasonal crafts, party ideas, and unique ways to celebrate special occasions with the people you love. You’ll find inspiration for Valentine’s Day tablescapes, gift ideas, and creative projects that complement your slime-making fun perfectly.
Flavor Variations for Valentine Floam Slime Recipe
While we can’t add actual flavors to craft slime, you can create variations in color, texture, and theme to customize your Valentine Floam Slime Recipe.
Scented Valentine Slime
Add dimension to your Valentine Floam Slime Recipe with scent. Essential oils work but use sparingly 2-3 drops maximum as oils can break down slime over time. Strawberry, cherry, vanilla, or rose scents are perfect for Valentine’s Day. Alternatively, use scented lotions mixed in during the fixing-stiff-slime stage. Some crafters add flavoring extracts (strawberry, cherry, vanilla) which are water-based and won’t affect slime texture. For children, ensure any scents used are non-toxic and remember that scented slime should never be tasted even though it smells good.
Glitter and Confetti Variations
Take your Valentine Floam Slime Recipe from simple to spectacular with add-ins. Fine glitter creates sparkly slime that catches light beautifully use cosmetic-grade glitter rather than craft glitter for safer play. Chunky glitter adds texture similar to foam beads. Heart-shaped confetti (paper or plastic) creates an obvious Valentine theme. Layer different colors with varying add-ins: white base slime with red hearts, pink slime with white foam beads and silver glitter, or red slime with pink hearts and gold glitter. For a “cookies and cream” look, make white slime with black foam beads.
Texture Modifications for Valentine Floam Slime Recipe
Experiment beyond traditional foam beads. Combine foam beads with fake snow powder for a cloud-floam hybrid. Add small plastic gems or rhinestones for sparkly crunch. Mix in air-dry clay pieces for a butter-floam texture. Create “clear floam” by using clear glue instead of white, then adding colored foam beads for a see-through effect with pops of color. For an icy texture, add a small amount of instant snow powder before foam beads. Here’s a comparison table of different variations:
| Variation Type | Materials Added | Texture Result | Best For | Difficulty Level |
|---|---|---|---|---|
| Classic Valentine Floam | Pink/red gel color + white foam beads | Crunchy, stretchy, opaque | Beginners, children | Easy |
| Glitter Love Slime | Color + foam beads + fine glitter | Sparkly, crunchy, glamorous | Gifts, older kids | Easy |
| Clear Heart Floam | Clear glue + colored foam beads + heart confetti | Translucent with visible add-ins | Display pieces, sensory play | Moderate |
| Cloud Floam | White slime + foam beads + instant snow | Super fluffy, crunchy, moldable | Tactile sensory seekers | Moderate |
| Butter Floam | Color + foam beads + clay pieces | Spreadable, crunchy, holdable | Making slime sculptures | Advanced |
| Metallic Valentine | Color + metallic pigment + foam beads | Shiny, pearlescent, crunchy | Teen crafters, Instagram-worthy | Moderate |
Each variation starts with the basic Valentine Floam Slime Recipe formula, then adds specialty materials during the final mixing stage. The texture results vary based on ratio more add-ins create less stretch but more sensory interest.
Serving Suggestions for Valentine Floam Slime Recipe
While “serving” slime might sound unusual, presentation and use matter for this craft project.
Packaging Valentine Floam Slime Recipe as Gifts
Your Valentine Floam Slime Recipe makes a thoughtful, handmade gift. Package in clear 4-ounce plastic containers or small mason jars so the beautiful colors show through. Add a label with “Happy Valentine’s Day” and the date made. Create a gift set with three small containers of different colors (pink, red, white) tied together with ribbon. Include care instructions on cute tags. For classroom valentines, make mini batches in 2-ounce containers enough for each child to have a portion. Pair your slime with a Valentine card or attach to a small toy for added value. For adults who enjoy stress relief, package in a nice tin with a note about the sensory benefits of slime play.
Activity Pairings with Valentine Floam Slime Recipe
Make slime-making part of a larger Valentine’s celebration. Host a slime-making party where guests create their own Valentine Floam Slime Recipe to take home. Pair with Valentine cookie decorating for a complete crafting experience. Use as a party favor at Valentine’s gatherings. Create a sensory Valentine basket with your floam slime, kinetic sand, stress balls, and fidget toys. For couples, make slime together as a fun date night activity it’s more engaging than you’d think! Teachers can use Valentine Floam Slime Recipe as a science lesson about polymers and non-Newtonian fluids, then let students take their creations home. Pair with Valentine dessert making for a full day of Valentine creativity, or start your celebration with heart-shaped bruschetta appetizers before diving into craft time.
Display and Decorative Uses
Beyond playing with your Valentine Floam Slime Recipe, consider decorative applications. Fill clear glass containers with layers of different colored floam slime for temporary Valentine centerpieces. Mold slime into heart shapes using cookie cutters and display on decorative plates. Create slime “bouquets” by forming slime into rose shapes around wooden skewer stems (use thick, well-activated slime for this). For parties, set up a slime bar where guests can customize their own Valentine Floam Slime Recipe with bowls of different colored bases, foam beads, glitter, and confetti similar to a sundae bar but for crafting.
FAQs About Valentine Floam Slime Recipe
Here are answers to the most common questions about making perfect Valentine Floam Slime Recipe.
Can I use liquid food coloring instead of gel for Valentine Floam Slime Recipe?
Yes, but with caution. Liquid food coloring contains more water than gel coloring, which can make your slime stickier and require more activator. If using liquid colors, add just 1-2 drops at a time and be prepared to use an extra tablespoon of contact solution. The colors also won’t be as vibrant as gel coloring produces. For the brightest Valentine pinks and reds, gel food coloring is worth the small extra investment. Some crafters use acrylic paint instead, which works well but can slightly stiffen the slime.
How do I fix slime that won’t activate in my Valentine Floam Slime Recipe?
Non-activating slime is frustrating but usually fixable. First, ensure your contact solution contains boric acid check the ingredients list. If it doesn’t, your slime won’t activate regardless of how much you add. Second, make sure you added baking soda to your glue mixture before adding contact solution these two ingredients work together to create activation. If both are present and slime is still sticky, keep kneading for 5-10 minutes; sometimes activation takes time. Add activator very gradually, one teaspoon at a time, kneading for at least one minute between additions. As a last resort, try a different activator like liquid starch. Old glue can also fail to activate, so check expiration dates.
Is Valentine Floam Slime Recipe safe for young children?
Slime is generally safe for children ages 4 and up with supervision. The ingredients are non-toxic, but slime should never be eaten. Supervise young children to ensure they don’t put slime in their mouths. Some children with sensitive skin may react to contact solution or borax-based activators test by having the child handle slime for just a few minutes first. If irritation occurs, wash hands immediately
PrintValentine Floam Slime Recipe: How to Make Perfect Love Slime
A fun Valentine-themed floam slime made with fluffy slime and colorful foam beads stretchy, crunchy, and perfect for sensory play or Valentine’s Day activities (not edible).
- Prep Time: 10 mins
- Cook Time: 0 mins
- Total Time: 10 mins
- Yield: 1 batch 1x
- Category: Craft
- Method: No-Cook
- Cuisine: N/A
Ingredients
- 1/2 cup white school glue
- 1/2 cup shaving cream
- 1/2 tsp baking soda
- 1 tbsp contact lens solution (with boric acid)
- Pink or red food coloring
- 1/2–1 cup foam beads
- Optional: glitter or heart confetti
Instructions
- 1. Pour glue into a mixing bowl.
- 2. Add shaving cream and stir until fluffy and fully combined.
- 3. Mix in baking soda.
- 4. Add food coloring and stir until evenly colored.
- 5. Slowly add contact lens solution while mixing until slime begins to form.
- 6. Knead slime with hands until no longer sticky.
- 7. Fold in foam beads and optional glitter or confetti.
- 8. Stretch and play.
Notes
- Not edible adult supervision recommended.
- Add more shaving cream for extra fluff.
- Store slime in an airtight container when not in use.
Nutrition
- Serving Size: N/A
- Calories: 0
- Sugar: 0g
- Sodium: 0mg
- Fat: 0g
- Saturated Fat: 0g
- Unsaturated Fat: 0g
- Trans Fat: 0g
- Carbohydrates: 0g
- Fiber: 0g
- Protein: 0g
- Cholesterol: 0mg
Keywords: valentine slime, floam slime, kids craft, sensory play