
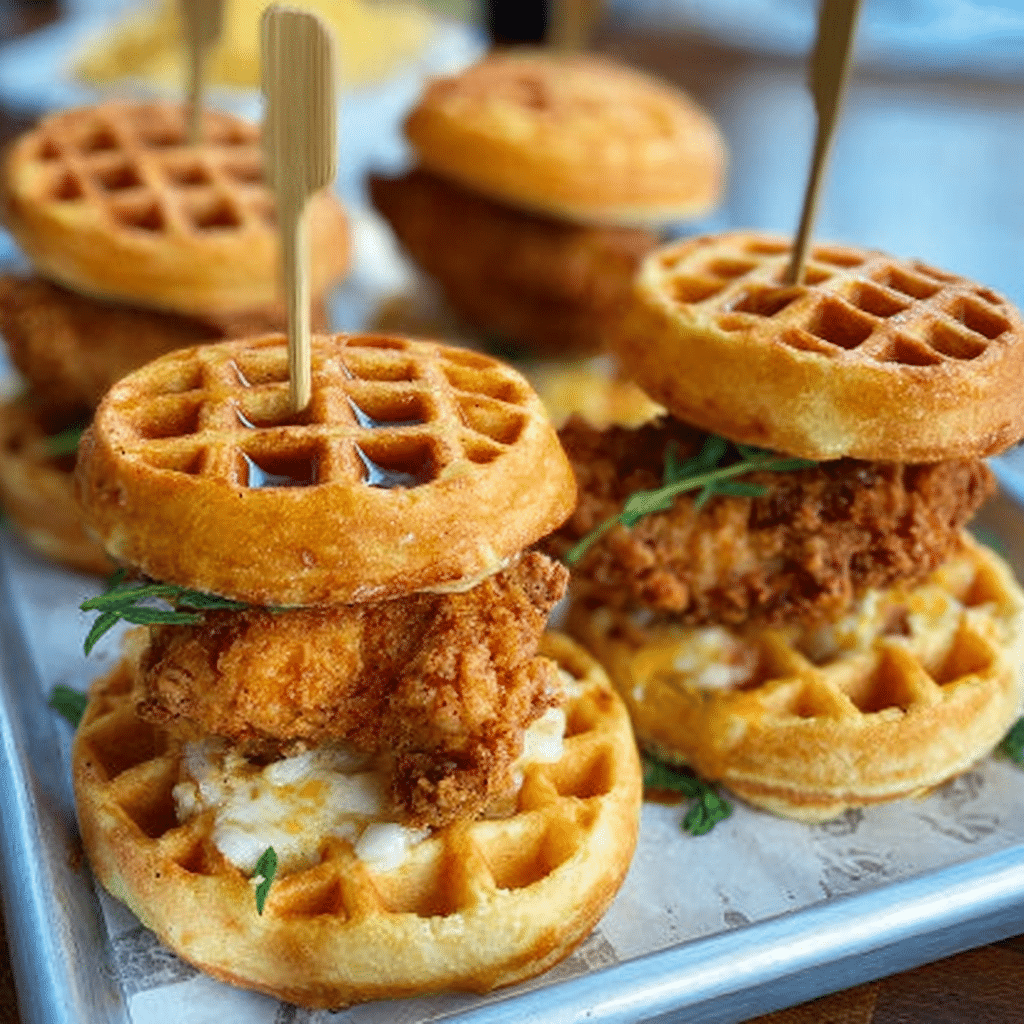
Chicken and waffle sliders are taking brunch tables by storm, and for good reason. Are you tired of bland, predictable brunch options that leave you underwhelmed? Maybe you’ve tried making fried chicken at home only to end up with greasy, soggy results that don’t come close to restaurant quality. I get it brunch should feel special, not stressful.
That’s exactly why I perfected this Chicken and Waffle Sliders recipe. These bite-sized beauties combine crispy, golden fried chicken with fluffy, sweet waffles and a drizzle of maple syrup that ties everything together. Each slider delivers that irresistible sweet-and-savory combo that makes brunch worth waking up for.
Hi, I’m Sam from dishfoody.com, and I’ve spent years developing recipes that bring joy to your kitchen without the hassle. I created this recipe after countless brunches where I craved something more exciting than the usual scrambled eggs and toast. Through trial and error, I’ve mastered the technique for chicken that stays crispy and waffles that are light yet sturdy enough to hold all those delicious toppings.
In this guide, you’ll discover everything you need to create perfect chicken and waffle sliders: from selecting the best chicken cuts to crafting waffles that won’t go soggy, plus cooking hacks that guarantee restaurant-quality results every time. I’ll also share pro tips for keeping your chicken crispy, flavor variations to match any taste preference, and answers to your most pressing questions about this brunch favorite.
Why This Chicken and Waffle Sliders Recipe Works
This recipe has become a reader favorite at Dishfoody because it delivers on three fronts: incredible flavor, surprising convenience, and amazing versatility for any brunch occasion.
Uses affordable, easy-to-find chicken cuts: You don’t need expensive ingredients to create an impressive brunch spread. This recipe works beautifully with chicken tenderloins or boneless thighs—both budget-friendly options available at any grocery store. The smaller cuts are perfect for slider-sized portions and cook quickly and evenly.
Quick prep time for maximum flavor: Unlike traditional fried chicken recipes that require overnight brining, these chicken and waffle sliders come together in under an hour. The buttermilk marinade tenderizes the chicken in just 15-30 minutes, while the waffle batter mixes up in minutes. This means you can decide on brunch and have it ready before your guests arrive.
Perfect for weekday brunches or special celebrations: Whether you’re hosting a casual family breakfast or an elegant brunch party, these sliders adapt to any occasion. Make them mini for appetizers, standard size for a main course, or create a DIY slider bar where guests customize their own with various toppings and sauces.
The sweet-savory balance is what truly makes these chicken and waffle sliders irresistible. The crispy, seasoned chicken provides a savory crunch, while the tender waffles add subtle sweetness. When you drizzle maple syrup over everything, it creates a flavor combination that keeps people coming back for seconds (and thirds!).
Choosing the Right Chicken for Chicken and Waffle Sliders
The success of your chicken and waffle sliders starts with selecting the right chicken. Not all cuts work equally well for this recipe, and making the right choice ensures tender, juicy results every time.
Best Chicken Cuts for This Recipe
Chicken tenderloins are my top recommendation for chicken and waffle sliders. These strips are naturally tender, cook quickly, and are perfectly sized for slider portions. They also have a mild flavor that pairs beautifully with seasonings and waffle sweetness. Since tenderloins are uniform in size, they cook evenly—no more dealing with some pieces being overcooked while others are undercooked.
Boneless, skinless chicken thighs are an excellent alternative if you prefer richer flavor and extra juiciness. Thighs contain more fat than breast meat, which keeps them moist during frying. Cut them into strips or small cutlets that match your slider size. The dark meat adds depth of flavor that stands up well to bold seasonings and sweet maple syrup.
Chicken breast cutlets work in a pinch, especially if you pound them thin. The key is to avoid thick chicken breasts, which can dry out before developing that perfect crispy coating. If using breasts, slice them horizontally to create thinner pieces, or use a meat mallet to pound them to about 1/2-inch thickness.
Buying Tips for Chicken and Waffle Sliders
When shopping for chicken, look for meat that appears pink with a slight sheen not gray or dull. Fresh chicken should smell neutral or slightly sweet, never sour or off-putting. Check the sell-by date and choose packages with the furthest date for maximum freshness.
If buying from a butcher counter, don’t hesitate to ask for custom cuts. Request chicken tenderloins cut to specific sizes for your sliders, or ask them to slice boneless thighs into strips. Butchers are usually happy to help, and this service is typically free.
For the best value, buy larger packages and freeze what you won’t use immediately. Separate raw chicken into meal-sized portions, wrap tightly in plastic wrap, then place in freezer bags. Label with the date and use within 3-4 months for optimal quality.
Substitutions for Chicken and Waffle Sliders
While chicken is traditional, you can adapt this recipe to various preferences and dietary needs. Turkey tenderloins work similarly to chicken and offer a slightly different flavor profile. They cook at the same temperature and time, making them an easy swap.
For a vegetarian version, substitute thick slices of firm tofu or cauliflower steaks. Press tofu to remove excess moisture, then marinate and coat it the same way you would chicken. Cauliflower steaks should be about 3/4-inch thick and par-cooked before breading to ensure tenderness.
Ingredients & Prep for Chicken and Waffle Sliders
Proper preparation is the foundation of exceptional chicken and waffle sliders. Taking a few extra minutes to prep your chicken and gather quality ingredients makes all the difference in your final results.
Chicken Prep Essentials
Start by patting your chicken completely dry with paper towels. This crucial step removes surface moisture that would prevent the coating from adhering properly. Wet chicken leads to a soggy, uneven crust that falls off during frying.
If using chicken thighs, trim away any excess fat or connective tissue. While some fat adds flavor, too much can make your sliders greasy. For tenderloins, check for the small white tendon that runs along one side and remove it by sliding a knife underneath while pulling gently.
Cut your chicken into pieces that match your slider size. Standard slider buns are about 2-3 inches across, so aim for chicken pieces slightly smaller than the bun diameter they’ll expand slightly during cooking. Uniform sizing ensures everything cooks at the same rate.
Season your chicken generously with salt and black pepper on both sides. This base seasoning enhances the natural chicken flavor before adding your marinade. Let the seasoned chicken rest at room temperature for 10-15 minutes while you prepare other ingredients. This brief tempering helps the chicken cook more evenly.
Marinades and Seasonings for Chicken and Waffle Sliders
The marinade tenderizes the chicken while infusing it with flavor. Here’s what you’ll need:
Buttermilk mixture: 2 cups buttermilk, 1 tablespoon hot sauce, 1 teaspoon garlic powder, 1 teaspoon onion powder, 1/2 teaspoon paprika, 1/2 teaspoon cayenne pepper (optional for heat)
Buttermilk’s acidity breaks down proteins, creating incredibly tender chicken in just 15-30 minutes. The longer marinating time isn’t necessary for chicken and waffle sliders since the smaller pieces absorb flavors quickly. Combine all marinade ingredients in a bowl, add your chicken pieces, and make sure each piece is fully submerged. Cover and refrigerate while you prepare the waffles and coating.
Seasoned coating mixture: 2 cups all-purpose flour, 1 tablespoon paprika, 1 teaspoon garlic powder, 1 teaspoon onion powder, 1 teaspoon dried thyme, 1/2 teaspoon cayenne pepper, 1 teaspoon salt, 1/2 teaspoon black pepper
This coating creates the crispy, golden exterior that makes these chicken and waffle sliders so addictive. The blend of spices adds complexity without overwhelming the dish. Mix all coating ingredients in a shallow dish, whisking to distribute seasonings evenly throughout the flour.
Waffle Ingredients for Chicken and Waffle Sliders
The waffles provide the perfect tender, slightly sweet base for your chicken. You’ll need:
2 cups all-purpose flour, 2 tablespoons sugar, 1 tablespoon baking powder, 1/2 teaspoon salt, 2 large eggs, 1 3/4 cups milk, 1/2 cup melted butter, 1 teaspoon vanilla extract
These proportions create waffles that are sturdy enough to hold toppings without being dense or heavy. The sugar adds subtle sweetness that complements the savory chicken without making the sliders taste like dessert. The melted butter creates a rich flavor and helps achieve that golden-brown exterior.
For the best texture, avoid overmixing your waffle batter. Small lumps are fine they’ll work themselves out during cooking. Overmixed batter develops too much gluten, resulting in tough, chewy waffles instead of light, fluffy ones.
Pantry Staples for Chicken and Waffle Sliders
Beyond the main ingredients, keep these essentials on hand:
Neutral cooking oil: Use vegetable, canola, or peanut oil for frying. You’ll need enough to fill your pan or skillet to a depth of about 1/2 inch. These oils have high smoke points, meaning they can reach frying temperatures without burning or creating off-flavors.
Maple syrup: Pure maple syrup is worth the investment for chicken and waffle sliders. Its complex, natural sweetness enhances both the chicken and waffles without being cloying. Grade A amber syrup offers a balanced flavor that works beautifully in this recipe.
Butter: Use unsalted butter for both waffle batter and finishing your sliders. A small pat of butter on warm waffles adds richness and helps the syrup distribute evenly.
Step-by-Step Cooking Instructions for Chicken and Waffle Sliders
Creating perfect chicken and waffle sliders requires attention to timing and technique, but the process is straightforward when you break it down into manageable steps.
Pre-Cooking Prep for Chicken and Waffle Sliders
Begin by setting up your cooking stations before you start frying. This organization makes the process smooth and prevents scrambling once you’re in the middle of cooking.
Remove your marinated chicken from the refrigerator and let it sit at room temperature for 10 minutes. Cold chicken dropped into hot oil lowers the oil temperature too quickly, resulting in greasy, undercooked results. Room-temperature chicken fries more evenly and develops a better crust.
Set up your breading station with three shallow dishes: one with the seasoned flour mixture, one empty dish for coated chicken, and your bowl of marinated chicken. This assembly line approach keeps your workspace organized and speeds up the coating process.
For the waffles, preheat your waffle iron according to the manufacturer’s directions. Most irons need 5-7 minutes to reach optimal temperature. A properly heated waffle iron ensures even cooking and that signature golden color. Lightly grease the waffle iron with cooking spray or brush with melted butter.
Prepare a cooling rack set over a baking sheet lined with paper towels. This setup is essential for keeping your fried chicken crispy—placing fried food directly on paper towels traps steam underneath, making the coating soggy.
Cooking Method for Chicken and Waffle Sliders
Making the waffles: While your oil heats, prepare your waffles first so they’re ready when the chicken finishes frying. Whisk together flour, sugar, baking powder, and salt in a large bowl. In a separate bowl, beat eggs, then add milk, melted butter, and vanilla extract. Pour the wet ingredients into the dry ingredients and gently fold together until just combined. Some lumps are fine—don’t overmix.
Pour about 1/2 cup of batter onto your preheated waffle iron (adjust amount based on your iron size). Close the lid and cook for 3-5 minutes until golden brown and crisp. The waffle should release easily when done—if it sticks, it needs more time. Transfer finished waffles to a wire rack to cool slightly. This prevents them from becoming soggy from trapped steam.
For slider-sized portions, cut each large waffle into 4 squares, or use a mini waffle iron for perfectly portioned bases.
Frying the chicken: Heat 1/2 inch of oil in a large, heavy-bottomed skillet over medium-high heat until it reaches 350°F. A cooking thermometer is invaluable here too cool and your chicken absorbs excess oil; too hot and the coating burns before the chicken cooks through.
Remove chicken pieces from the buttermilk marinade, letting excess drip off. Dredge each piece in the seasoned flour mixture, pressing gently to help the coating adhere. Shake off excess flour, then place coated pieces on your empty dish. Let the breaded chicken rest for 2-3 minutes this helps the coating stick during frying.
Carefully place chicken pieces in the hot oil without overcrowding. Work in batches if necessary, leaving space between pieces for even cooking and easy flipping. Fry for 4-5 minutes on the first side until deep golden brown, then flip and cook another 3-4 minutes until the second side matches in color.
Transfer cooked chicken to your prepared cooling rack. The internal temperature should reach 165°F when checked with an instant-read thermometer in the thickest part.
Doneness Check for Chicken and Waffle Sliders
Temperature is your most reliable indicator of properly cooked chicken. Insert an instant-read thermometer into the thickest part of the chicken without touching bone or the pan. For chicken and waffle sliders, you’re looking for an internal temperature of 165°F.
Visual cues also help determine doneness. The coating should be deep golden brown and crispy. When you cut into a piece, juices should run clear, not pink or cloudy. The meat should be opaque white throughout with no translucent or raw-looking areas.
If your chicken reaches the correct internal temperature but the coating isn’t as crispy as you’d like, you can finish the pieces in a 400°F oven for 3-5 minutes. This additional heat crisps the exterior without overcooking the meat.
Resting for Chicken and Waffle Sliders
Let your fried chicken rest on the wire rack for 3-5 minutes before assembling sliders. This brief rest allows the juices to redistribute throughout the meat, ensuring every bite is moist and flavorful. The coating also continues to crisp during this time as surface moisture evaporates.
For the waffles, if you made them ahead, you can reheat them briefly in a 300°F oven for 2-3 minutes to restore their warmth and crispness. Avoid microwaving waffles, which makes them soggy and tough.
Pro Tips for Perfect Chicken and Waffle Sliders
Elevate your chicken and waffle sliders from good to outstanding with these professional techniques I’ve developed through years of recipe testing.
Avoiding Tough or Dry Chicken in Chicken and Waffle Sliders
The number one mistake people make is overcooking chicken. Even a few minutes too long transforms juicy meat into dry, tough disappointment. Use an instant-read thermometer every time it’s the only way to guarantee perfect results.
Don’t skip the buttermilk marinade, even if you’re short on time. Just 15 minutes makes a noticeable difference in tenderness. The acid in buttermilk breaks down tough proteins, and the coating adheres better to marinated chicken.
Maintain consistent oil temperature throughout frying. When you add chicken to the pan, the temperature naturally drops. If it falls below 325°F, your chicken absorbs oil instead of crisping. Work in small batches and let the oil return to 350°F between batches.
If you find your coating is browning too quickly before the chicken cooks through, reduce your heat slightly. It’s better to fry a bit longer at lower temperature than to burn the outside while leaving the inside undercooked.
Tool Recommendations for Chicken and Waffle Sliders
Invest in an instant-read digital thermometer it’s the most important tool for perfect chicken and waffle sliders. Models with a probe and wire allow you to monitor temperature without opening your oven or lifting food from oil. This prevents heat loss and ensures accuracy.
A cast-iron skillet is ideal for frying chicken. It retains heat better than thin pans, maintaining consistent temperature even when you add cold chicken. The heavy bottom also prevents hot spots that can burn your coating.
A quality waffle iron with adjustable temperature settings gives you control over browning. Look for one with a nonstick coating and indicator lights that signal when it’s ready. Belgian-style waffle irons with deep pockets work beautifully for chicken and waffle sliders, creating sturdy bases with room for syrup.
Wire cooling racks are essential for keeping fried food crispy. The elevated design allows air to circulate on all sides, preventing the soggy bottoms that occur when fried food sits directly on plates or paper towels.
Storage and Reheating for Chicken and Waffle Sliders
Store leftover fried chicken and waffles separately to maintain the best texture. Place cooled chicken in an airtight container and refrigerate for up to 3 days. Waffles can be stored the same way, separated by parchment paper to prevent sticking.
For longer storage, freeze components individually. Arrange fried chicken pieces on a baking sheet and freeze until solid, then transfer to freezer bags. This prevents pieces from freezing together. Frozen fried chicken keeps for up to 2 months. Freeze waffles the same way they’ll stay fresh for up to 3 months.
To reheat fried chicken and waffle sliders, never use the microwave, which makes coatings soggy. Instead, place chicken on a wire rack over a baking sheet and bake at 375°F for 10-15 minutes (or 20-25 minutes from frozen) until heated through and crispy. Toast waffles in a toaster or toaster oven until warmed and slightly crisp.
For best results, assemble your chicken and waffle sliders just before serving. Reheated components taste freshly made when you add warm chicken to toasted waffles and drizzle with maple syrup at the last moment.
Want more delicious brunch inspiration and recipe ideas? Explore my curated collection on Pinterest where I share hundreds of drool-worthy photos, cooking tips, and creative variations for chicken and waffle sliders and other crowd-pleasing dishes. Follow along for daily recipe inspiration that’ll transform your brunch game!
Flavor Variations for Chicken and Waffle Sliders
One of the best things about chicken and waffle sliders is their versatility. With simple tweaks, you can create entirely different flavor profiles to match any preference or occasion.
Spicy Chicken and Waffle Sliders
For heat lovers, amp up the spice in both the marinade and coating. Add 2 tablespoons of hot sauce to your buttermilk marinade, and increase the cayenne pepper in your coating to 1 full teaspoon. You can also brush finished chicken with Nashville hot sauce a mixture of cayenne pepper, brown sugar, and melted butter that creates an addictively spicy glaze.
Consider spicy maple syrup as a finishing touch. Warm 1/2 cup maple syrup with 1/2 teaspoon cayenne pepper and a pinch of smoked paprika. This creates a sweet-heat combination that perfectly balances the rich chicken and waffles.
For an extra kick, add sliced jalapeños or a few dashes of your favorite hot sauce between the waffle and chicken. The cool, sweet waffle helps temper the heat while letting the spicy flavors shine.
Sweet and Savory Chicken and Waffle Sliders
Enhance the sweet-savory contrast by adding honey butter to your waffles. Whip together equal parts softened butter and honey, then spread on warm waffles before adding chicken. This creates a luxurious layer that melts into the waffle pockets.
Try adding a tablespoon of sugar or honey to your chicken coating for a subtle sweetness that caramelizes during frying. This creates a coating similar to honey-fried chicken that pairs beautifully with traditional waffles.
PrintChicken and Waffle Sliders: Best Easy Recipe for Brunch Lovers

Savory-sweet chicken and waffle sliders featuring crispy chicken tucked between fluffy waffles and finished with buttery maple syrup a fun and irresistible handheld favorite.
- Prep Time: 10 mins
- Cook Time: 15 mins
- Total Time: 25 mins
- Yield: 12 sliders 1x
- Category: Appetizer
- Method: Stovetop
- Cuisine: Southern-Inspired
Ingredients
- 12 mini waffles
- 12 crispy chicken tenders or nuggets
- 1/2 cup maple syrup
- 2 tbsp butter, melted
- 1/2 tsp smoked paprika
- 1/4 tsp black pepper
- Optional hot sauce
- Toothpicks for serving
Instructions
- 1. Cook waffles according to package directions and keep warm.
- 2. Prepare chicken tenders or nuggets until crispy.
- 3. Stir smoked paprika and black pepper into melted butter.
- 4. Brush waffles lightly with seasoned butter.
- 5. Place one piece of chicken on a waffle.
- 6. Drizzle with maple syrup and optional hot sauce.
- 7. Top with another waffle to form a slider.
- 8. Secure with toothpicks and serve warm.
Notes
- Use spicy chicken for extra kick.
- Serve with honey butter or flavored syrups.
- Great for brunch parties or game day snacks.
Nutrition
- Serving Size: 2 sliders
- Calories: 320
- Sugar: 12g
- Sodium: 520mg
- Fat: 16g
- Saturated Fat: 6g
- Unsaturated Fat: 9g
- Trans Fat: 0g
- Carbohydrates: 32g
- Fiber: 1g
- Protein: 14g
- Cholesterol: 65mg
Keywords: chicken and waffle sliders, sweet and savory sliders, brunch sliders, party food